Cisco Spaces Asset Tracking Runbook (Cisco Validated)
OVERVIEW
This Cisco Validated runbook is designed only as a follow on from the Spaces OS Runbook. It provides a comprehensive guide on asset tracking using Cisco Spaces. It includes an overview of asset tracking, recommended prerequisites, wireless infrastructure setup for both Catalyst and Meraki systems, AP density and placement guidelines, Spaces infrastructure requirements, implementation steps for Catalyst and Meraki, and the configuration of IoT services. Additionally, it covers the requirements for asset tags and detailed instructions for setting up the Spaces Connector and integrating with WLC.
Lack of real-time Asset tracking solutions can add critical bottleneck to the supply chain operations and in the healthcare industry, cause life-threatening delays.
Spaces native apps can track all devices connected to the network in real time and with a host of partner apps & BLE devices, which can monitor and manage all critical or high value assets in the campuses
Track all devices connected to the network
Access to industry-leading applications with the App marketplace
Easy deployment of third-party apps & devices with additional gateways
Scale & manage IoT devices & partner apps
Use Cases:
Healthcare: Manage medical equipment in real-time and improve operational efficiency
Retail & Hospitality: Track high value assets and equipment within the campuses
Workspaces: Locate all devices connected to the network on a map interface for real-time tracking
Manufacturing: Track the location of high value assets
SUPPORT & ONBOARDING INFO
Please follow the link below to find out about the different ways to get support for Cisco Spaces.
PREREQUISITES
This runbook should only be used as a follow on from the Spaces OS Runbook. If that runbook has not been completed, go back and validate the deployment against that first.
Catalyst
Within Catalyst AP environment, we are aiming for 2 key requirements; BLE support, and IOX Container support on the AP. APs providing both of these requirements will allow the use of Advanced IOT Gateway support. Those only providing BLE, will show as Base. APs not included on the following list, are not supported APs for Asset Tracking use cases, but may be supported for other use cases, such as occupancy.
AP Model | BLE | IOT Gateway Support |
|---|---|---|
9162 | Yes | Advanced |
9164 | Yes | Advanced |
9166 (inc. D1) | Yes | Advanced |
9136 | Yes | Advanced |
9105 | Yes | Advanced |
9115 | Yes | Advanced |
9117 | Yes | Advanced |
9120 | Yes | Advanced |
9130 | Yes | Advanced |
1815i | Yes | Base |
1815w | Yes | Base |
1815m | Yes | Base |
1840 | Yes | Base |
4800 | Yes | Base |
Advanced Gateway - Recommended
The Cisco Spaces Advanced IOT Gateway allows us to gather extra data from IOX compatible devices found from the Spaces IOT Device Marketplace.
This is particularly relevant for asset tracking, as we can capture battery life of tags through this extra data, meaning tags don’t just drop off the network, and we can manage replacing tags when needed.
The advanced gateway leverages both the IOT radio, and the IOX container capability, and as a result, a smaller subset of AP's are supported.
To manage the IOX container functionality, these AP's are required to be managed by a 9800 WLC, all are supported. Suggested for code versions is 17.9.x (latest). There have been significant improvements in IOT Services on 9800 since 17.9.5, so lowest recommended is 17.9.6 - See 9800 Known IOX Issues for more details.
Base Gateway
Base gateway functionality purely collects RSSI from tags, meaning we only need access to the BLE radio on the AP, not IOX. As a result, the list is more extensive, but the use cases are limited.
For particular note within asset tracking, we will not be able to receive the battery level of IOT tags, whether they are from the IOT Marketplace or not. This will serve difficult in maintenance of the solution, as tags may simply drop off without warning.
Even for the base gateway, 9800 is still utilised, and 17.9.6 is still the minimum recommended code version.
Base gateway functionality is not recommended where advanced gateways can be used, it often serves a inferior solution, and provides less expandability for future use cases.
Meraki
For Meraki deployments, we have no such feature as the IOX container, meaning we simply leverage the BLE radio on the AP directly. This means the use case is easier to deploy, but comes with some limitations.
We can only leverage Eddystone or iBeacon formats, and cannot collect any 'extra data; that we can with the advanced gateway. In summary, on Meraki deployments we can deliver base gateway functionality only - See Base Gateway.
Due to the fact we only leverage the BLE radio for Meraki deployments, the pre-requisites are less stringent.
In summary, we support any Meraki AP Wave 2 and onwards, on firmware version 29 and above (latest is suggested).
Technology | Supported APs |
|---|---|
Wave 2 | MR33, MR42, MR42E, MR52, MR53, MR53E, MR74, MR84 |
WiFi 6 | MR28, MR36, MR36H, MR44, MR45, MR46, MR46E, MR55, MR56, MR76, MR78, MR86 |
WiFi 6E | MR57, CW9162I, CW9164I, CW9166I, CW9163E |
AP Density
General guidance for designing for location services has not changed over the years, and we still follow 4 main guidelines
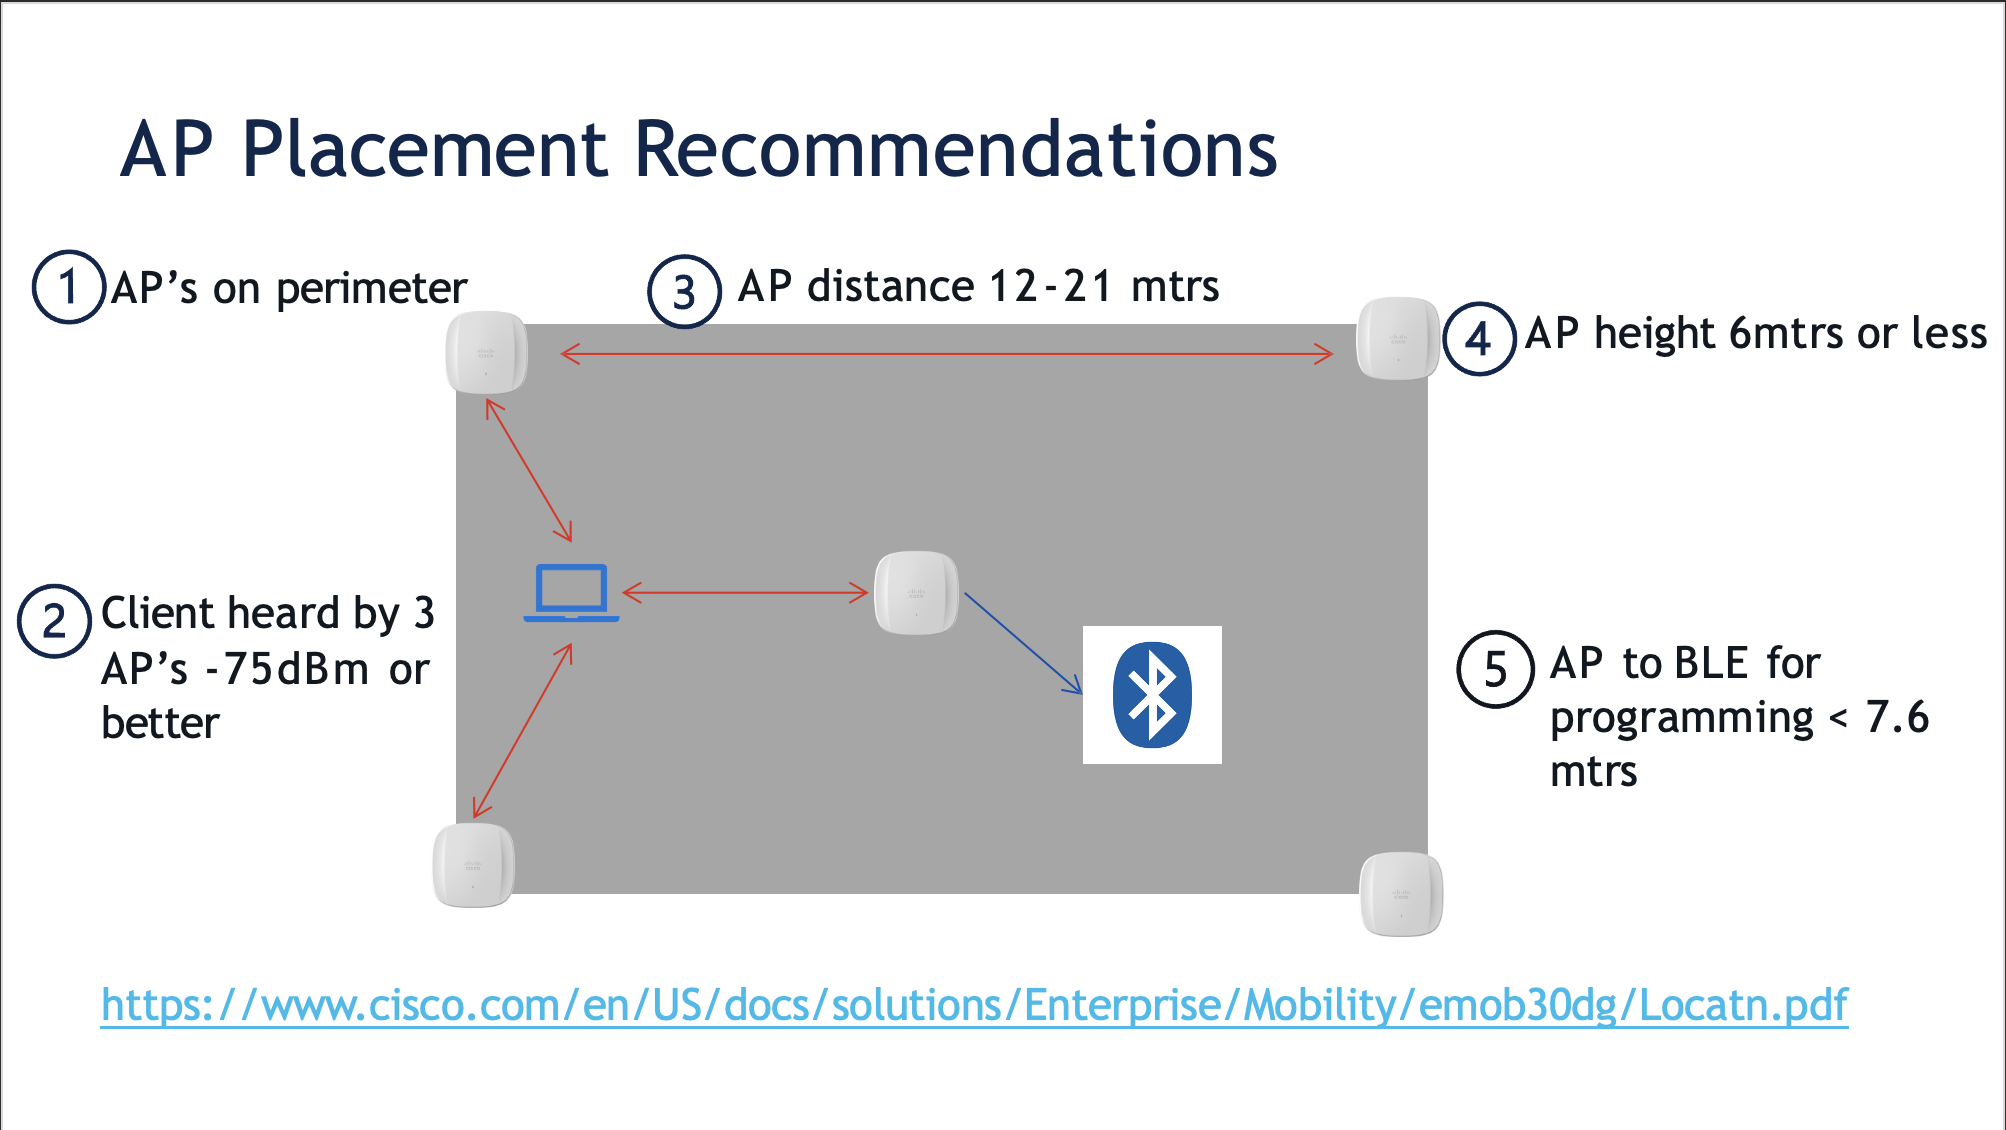
4 guidelines for designing for location services:
AP’s should be around the perimeter (aiming to surround any client with AP's on all sides)
Clients should be heard by 3 or more AP's, at -75dBm or better
AP's should be spaces 12-21 meters (39-67 ft) apart
AP's should be deployed at 6 meters (20 ft) or less
AP Placement Check
With AP Auto Location access points on a Digital Map can be automatically located in Cisco Spaces. By improving device location accuracy and reducing troubleshooting efforts caused by incorrect AP placement, AP Auto Location helps streamline deployments, reduce complexity, save time, and minimize costs associated with verifying and placing APs on maps.
Product | Platform | Releases |
|---|---|---|
Cisco Catalyst 9100 Family of Access Points |
| Minimum required version is Cisco IOS XE 17.12.1 |
Cisco Catalyst 9800 Series Wireless Controllers | Cisco Catalyst 9800 Series Wireless Controllers | Cisco IOS XE 17.12.x |
Cisco Spaces | Cisco Spaces: Connector 3 | Location Service 3.1.0.94 or later |
Cisco Catalyst 9800 Series Wireless Controllers must be connected to the Cisco Spaces: Connector and both must be available in the Cisco Spaces cloud account.
Digital maps must be available for the floors to place the AP. Use the Locations & Maps feature to add digital maps. For more information, see Setting up Locations and Maps.
Site tags are mandatory for the floors. Use the Cisco Catalyst 9800 Series Wireless Controllers GUI to create site tags. The APs that are being placed in Cisco Spaces must be associated with the site tags. For more information about configuring site tags, see "Configuring a Site Tag" in the Cisco Catalyst 9800 Series Wireless Controller Software Configuration Guide.
Generating ranging data for default site tags is not supported in Cisco Spaces.
AP Auto Locate is also being implemented for both Meraki Dashboard, and Catalyst Center. This would allow automatic placement of APs in respective management platforms, and then ingestion of AP placement into Spaces.
AP Auto Locate - Catalyst Center (Currently not available).
For an in-depth guide for AP Auto Locate please refer to the Configuration Guide.
Asset Tags
Choosing asset tags is a core part of implementing a good asset tracking solution.
There are a number of core fundamentals to consider when choosing physical tags for a solution:
Price
Compatibility
Form factor
Battery life
Extra features (e.g. temperature or button press)
The Spaces IOT Device Marketplace is a page dedicated to providing this information, and connecting buyers to sales teams from the respective tag supplier.
The marketplace also offers a list of tags that have been validated to work with the advanced gateway setup, meaning we will be able to gather battery life (as well as the option of other data), along side delivering location.
The platform is also capable of supporting any iBeacon or Eddystone tag, delivering just base location functionality, and no other data.
These tags may be more appropriate for a base gateway solution.
IMPLEMENTATION
To complete these steps, an admin will require read/write permissions within Spaces for IOT Services and IOT Explorer
Given the above prerequisites have been met, its now time to implement our asset tracking use cases.
For each stack (Catalyst or Meraki), we will cover whats needed to add these stacks to Spaces, how to enable IOT services, then how to deliver outcomes.
This implementation section is particularly focused towards our use case of asset tracking, but many steps are matched for other use cases, so it may be necessary to skip, or just verify some steps.
Configuring IOT Services
Now all infrastructure and hierarchy is setup, IOT Services can be enabled. This will push configuration to our controller, as well as push the IOX container to the AP, enabling BLE and creating a telemetry stream for the data.
Navigate to About IoT Services page on the left-hand side of the Menu > IoT Services.
On Day 0 of the IoT Services Activation an Amber Banner will be at the top that signals the deployment hasn't started yet.
Once all the prerequisites are met, click Activate button on the Amber Banner. Alternatively, click on Activate IoT Services to begin.
Select Wireless and click on Next.
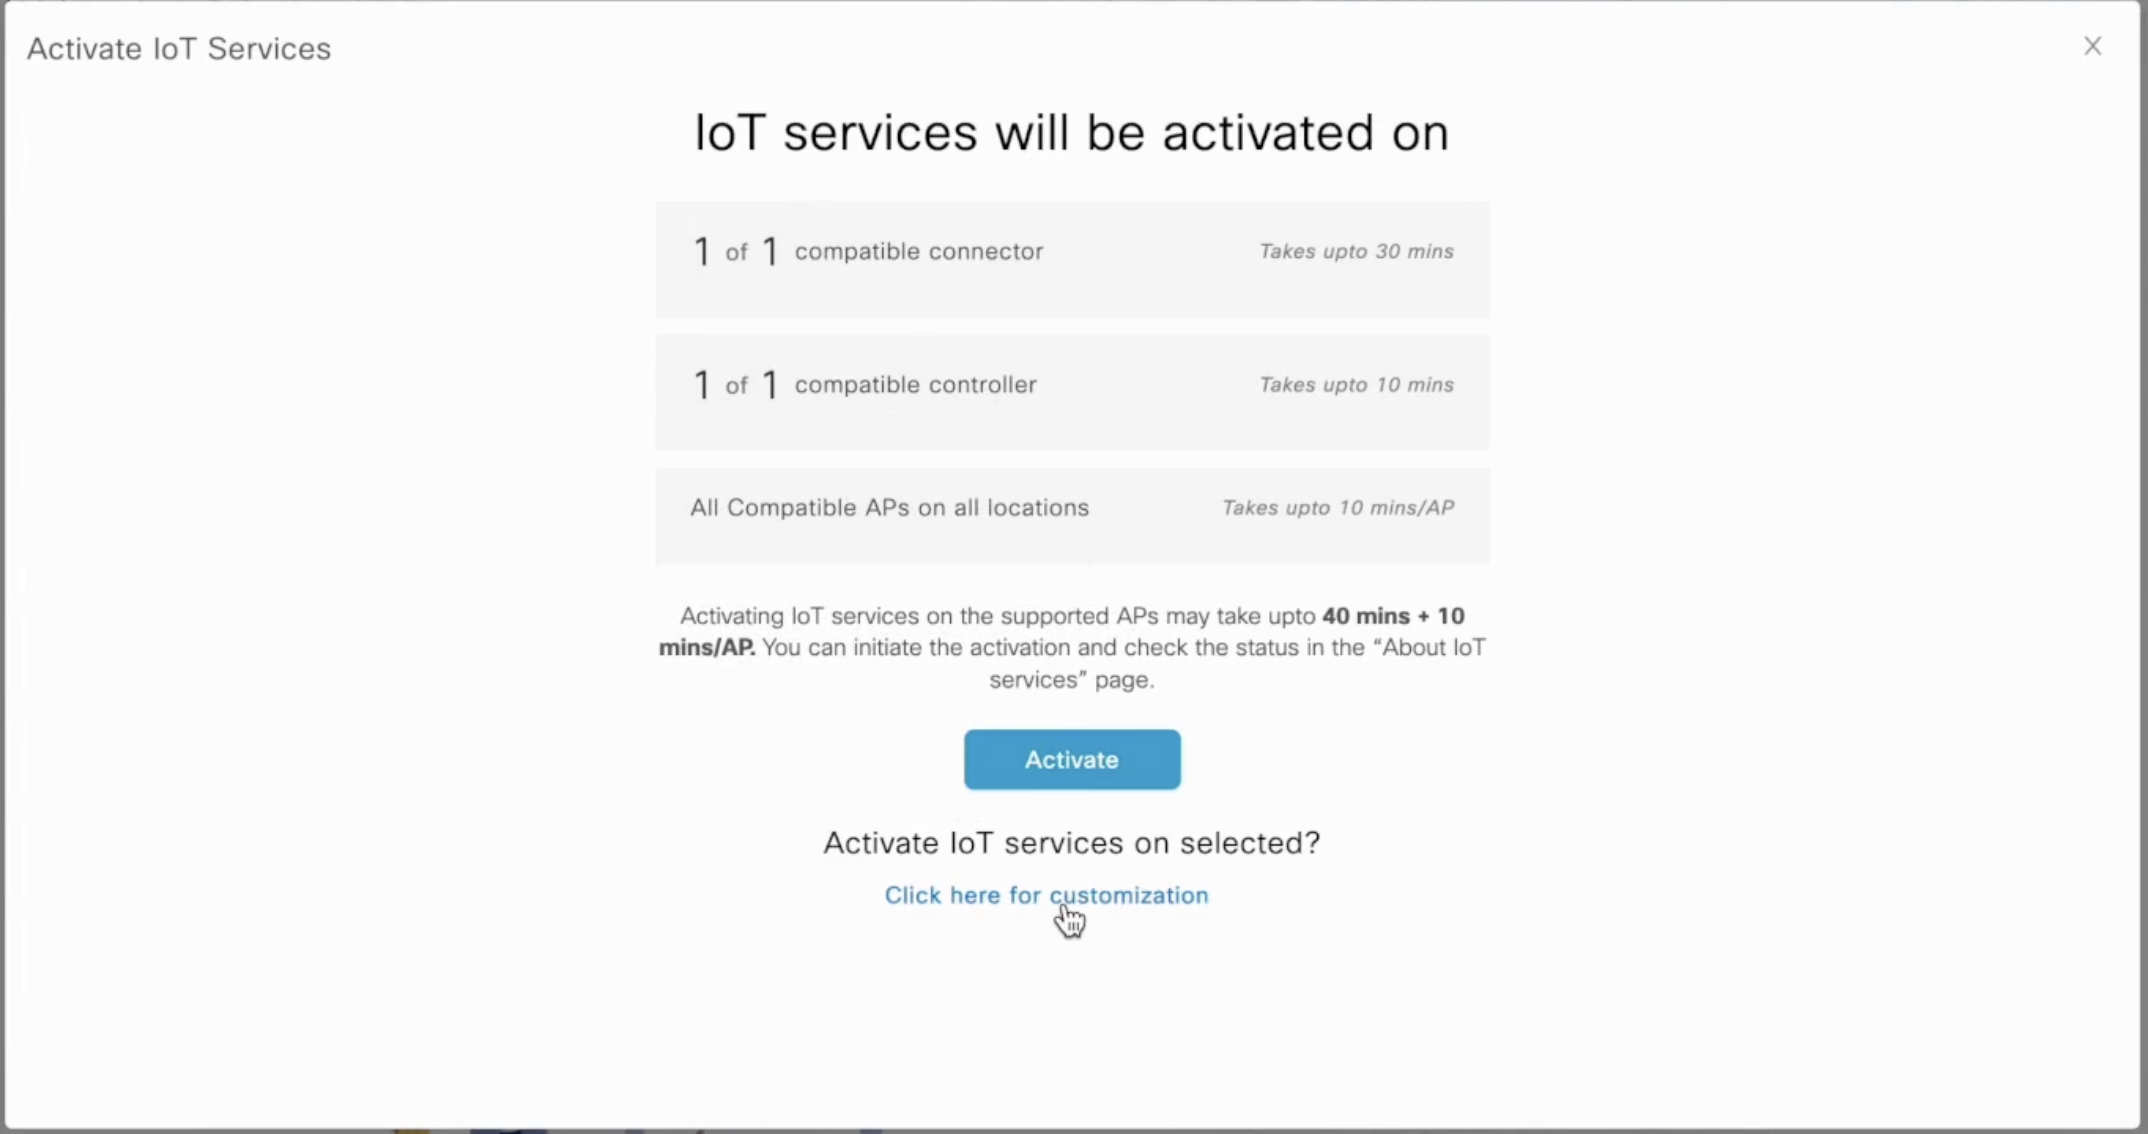
After the Prerequisite Check Screen it progresses to Activation Screen that shows how many Connectors and Controllers are up.
Post Activation Summary Screen, there are two ways to deploy IoT services.
Here, click either Activate to enable IOT Services everywhere, or click Click here for customization to only enable IOT Services on selected connectors, controllers or AP's.
Following this process, will enable all compatible AP's to be advanced gateways (as dictated above), and all other AP's will be enabled as base gateways.
Claim and Configuring Asset Tags
We now have everything ready to start tracking our asset tags, but first, we should claim the beacons and push any configuration.
First, lets claim our beacons.
Click here for a video guided demo
Under IOT Services > Device Management, click the blue button in the middle of the screen labelled Onboard Devices.
Select Floor Beacons.
Fill out the order ID. This is usually sent by the tag manufacturer by email at point of ordering, and/or will be included in the packaging of the tags themselves. Then hit Add to Inventory.
Now we can go ahead and push out any config changes needed to our claimed beacons.
Click here for video guided demo
Configure claimed beacons by navigating to IoT Services > Device Management > Devices > Claimed Beacons.
Click the Configure Beacons link which will open the beacon configuration portal.
Identify the beacon via its Unique ID in the Device Inventory as well as printed on the physical device.
Make any configurations changes as needed, and when ready to apply the changes, click the SAVE CHANGES button. Test this out by enabling telemetry on a beacon via the beacon configuration page, then verify this operation was a success by clicking on an individual beacon in the Device Inventory and selecting Telemetry.
Verify in Device Management > Devices > Claimed Beacons that the changes have been applied by selecting the beacon and viewing its request history and viewing its updated settings, such as UUID, Major, Minor, Transmission Power, Transmission Frequency, as well as telemetry and location data.
Spaces Apps
Spaces delivers a number of use cases (known as apps) within the platform. These cover a great range of use cases, but here we will deep dive on the implementation and usability of the apps particularly focused on delivering asset tracking outcomes. For more information on other Cisco Spaces outcomes, please see the outcome store.
IoT Explorer - Preferred
IoT Explorer is an application designed to cater to specific use case needs. Deploy and create use cases effortlessly, including asset tracking, temperature monitoring, and presence detection, all in one centralized dashboard.
Centralize/Consolidate asset tracking process and obtain live insights into the location and usage of assets globally. Tailor notifications according to personalized guidelines and receive prompt alerts for significant shifts in asset behaviour and whereabouts.
Value Delivered: Increase operational efficiency to save time & cost, gain insights from historic trends to enhance decision-making, and deliver real-time visibility to stakeholders.
Useful to: Operations, Facilities, IT, Security
Lets create our first asset tracking use case within IoT Explorer.
Click here for a video guided demo
Head into IoT Explorer > Asset Tracking, then select Get Started.
Enter a Use Case Name and also a Description for the use case.
Now under Configure > Manage Assets > Import Assets, we can select our assets to import. This can either be done by setting up existing device filters, or through a CSV bulk import. If the beacons are already claimed, use the Existing Device Filter Criteria.
Assets should now be visible to locate within the Locator tab, and also in a list view within the Assets tab. In both of these tabs, clicking a given asset can provide more info, history, battery life etc. Searching for given assets here makes it easier to narrow down specific assets.
We can now generate rules for these assets within Rules > Add Rule.
Configure a Rule Name at the top of the screen.
Start by adding in a Rule element from the right hand pane. Note: Only one rule element can be configured per rule.
Next drag in and configure some Condition elements. These conditions can be combined to generate more or less complex ruling setups.
Now, add in Actions to determine what happens when the rule is triggered and matches the set conditions. Note: The action ‘Log the event’ is set by default and cannot be removed. It is recommended to configure these logs by clicking the action and adding context.
Finally, hit Save & Publish to put the new rule into practice.
Now that a rule is in place, take a look in the Events tab, and see if any of the rules have been triggered. Events can also be exported here for compliance use cases.
REFERENCE
Connector IP Requirements
Region | Primary IP Address | Disaster Recovery |
|---|---|---|
Global Setup (IO) | 52.20.144.155 | 54.176.92.81 |
EU Setup (EU) | 63.33.127.190 | 3.122.15.26 |
Singapore Setup (SG) | 13.228.159.49 | 13.214.251.223 |
9800 Known IOX Issues
Bug ID | Title | Fixed in release | Comments |
|---|---|---|---|
CSCwj93064 | 17.15.1 - IOX App Installation failing on 9178 SI WiFi 7 AP, 4800 TI | 17.9.5ES08, 17.9.6, 17.12.4, 17.15.1 | Sometimes IOX Application install would fail |
CSCwk18357 | After IOX app uninstall on 9130 SI stopped functioning in Dual mode | 17.9.5ES08, 17.9.6, 17.12.4, 17.15.1 | Affecting APs in Dual Mode |
CSCwk21493 | On Capwap AP restart BLE interface state on WLC is changed to Closed state | 17.9.5ES08, 17.9.6, 17.12.4, 17.15.1 | Affects the observation and the status only, not functional impact |
CSCwj92716 | Native mode and IOx app both use iot uart interface leading to continuous iot chip resets | 17.9.5ES06, 17.9.6, 17.12.4, 17.15.1 | Whenever the AP (re)boots or activates the Cisco Spaces IoT-Services IOX App, there is a possibility that the AP will not fully convert to "Advanced"/IOX Mode, preventing the IOX App from being able to control the BLE Radio. |
CSCwj19805 | AP 9130AX BLE 2.7.22 Advertising 0dBm TxPower and chip sync issue during firmware upgrade | 17.9.5ES03, 17.9.6, 17.12.4, 17.15.1 | Affects only TI based APs in Transmit or Dual mode, for wayfinding type use cases |
CSCwj98884 | iox status down after capwapd crash and grpc is not established when certificate is malformed | 17.9.5ES06, 17.9.6, 17.12.4, 17.15.1 | Affects BLE channel if there is a CAPWAP crash. Requires a re-start of IOT services, pushing of the certificate again |
CSCwi57873 | TI AP - BLE Resets , connect/disconnect times out sometimes | 17.9.5ES06, 17.9.6, 17.12.4, 17.15.1 | Affects TI based APs due to older SDK not responding |
CSCwi64652 | AX APs do not reset BLE interface after 100 attempts | 17.9.5ES01, 17.9.6, 17.12.4, 17.15.1 | Affects TI based APs which get stuck after 100 resets |
CSCwk00429 | IOX App starts after reboot but never reached RUNNING state | 17.9.6, 17.12.4, 17.15.1 | Sometimes seen that the IOX app does not fully deploy until it is reinstalled |
CSCwk00501 | Cisco Spaces IOT Services Exhausts IOX App Storage due to Constant Resets | Fixed in IOX app version 1.6.33+ | corner case, affects if AP is already in a bad state |
CSCwk00645 | Cisco Spaces Connector drops gRPC connection request after ~2500 APs established | Fixed in IOT Wireless docker version 3.1.3.17+ | Any APs attempting to establish gRPC to the Spaces Connector after ~2500 have already done so will fail to establish gRPC against the connector |
CSCwk99004 | Default Channel Pipeline data channel disconnection | Fixed in IOT Wireless docker version 3.1.3.44+ | Connector can experience data channel disconnects. The default channel pipeline on iot-services and location can encounter an exception, which causes service interruption. |
No bug ID | Multiple other fixes, improvements, metrics, logging etc | Fixed in IOT Wireless docker version 3.1.3.44+ | No bug IDs, but multiple fixes and improvements have been made in the IOT Docker |
Cisco Spaces Connector Ports Used
