Cisco Spaces Smart Rooms Runbook (Cisco Validated)
OVERVIEW
What Are Cisco Smart Rooms?
Cisco Smart Rooms seamlessly integrate your existing Cisco Webex devices with your Building Management System (BMS) to provide demand control ventilation, optimize the experience, wellbeing, and productivity of your existing spaces when in use, and reduce energy use when spaces are not in use.
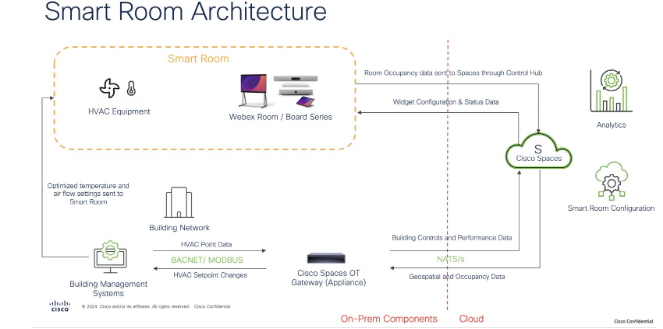
Some Cisco devices, such as the Webex Room Kit and some partner devices within the Cisco Spaces Marketplace, can detect occupancy within a given space. That occupancy data is first sent to the Cisco Spaces Cloud. It’s then sent to the Cisco Spaces Building Gateway which connects to your BMS network as a virtual BACnet device. The Cisco Spaces Building Gateway is the only new hardware needed if you already have the Webex Room Kit installed. Your BMS can then adjust temperature and air flow settings based on the occupancy of the space.
SUPPORT AND ONBOARDING
Please follow the link below to find out about the different ways to get support for Cisco Spaces.
PREREQUISITES
This runbook should only be used as a follow on from the Spaces OS Runbook. Please refer to that document before progressing here.
In addition to the Spaces OS installation, below are the more specific requirements for Smart Rooms.
Prerequisites Checklist
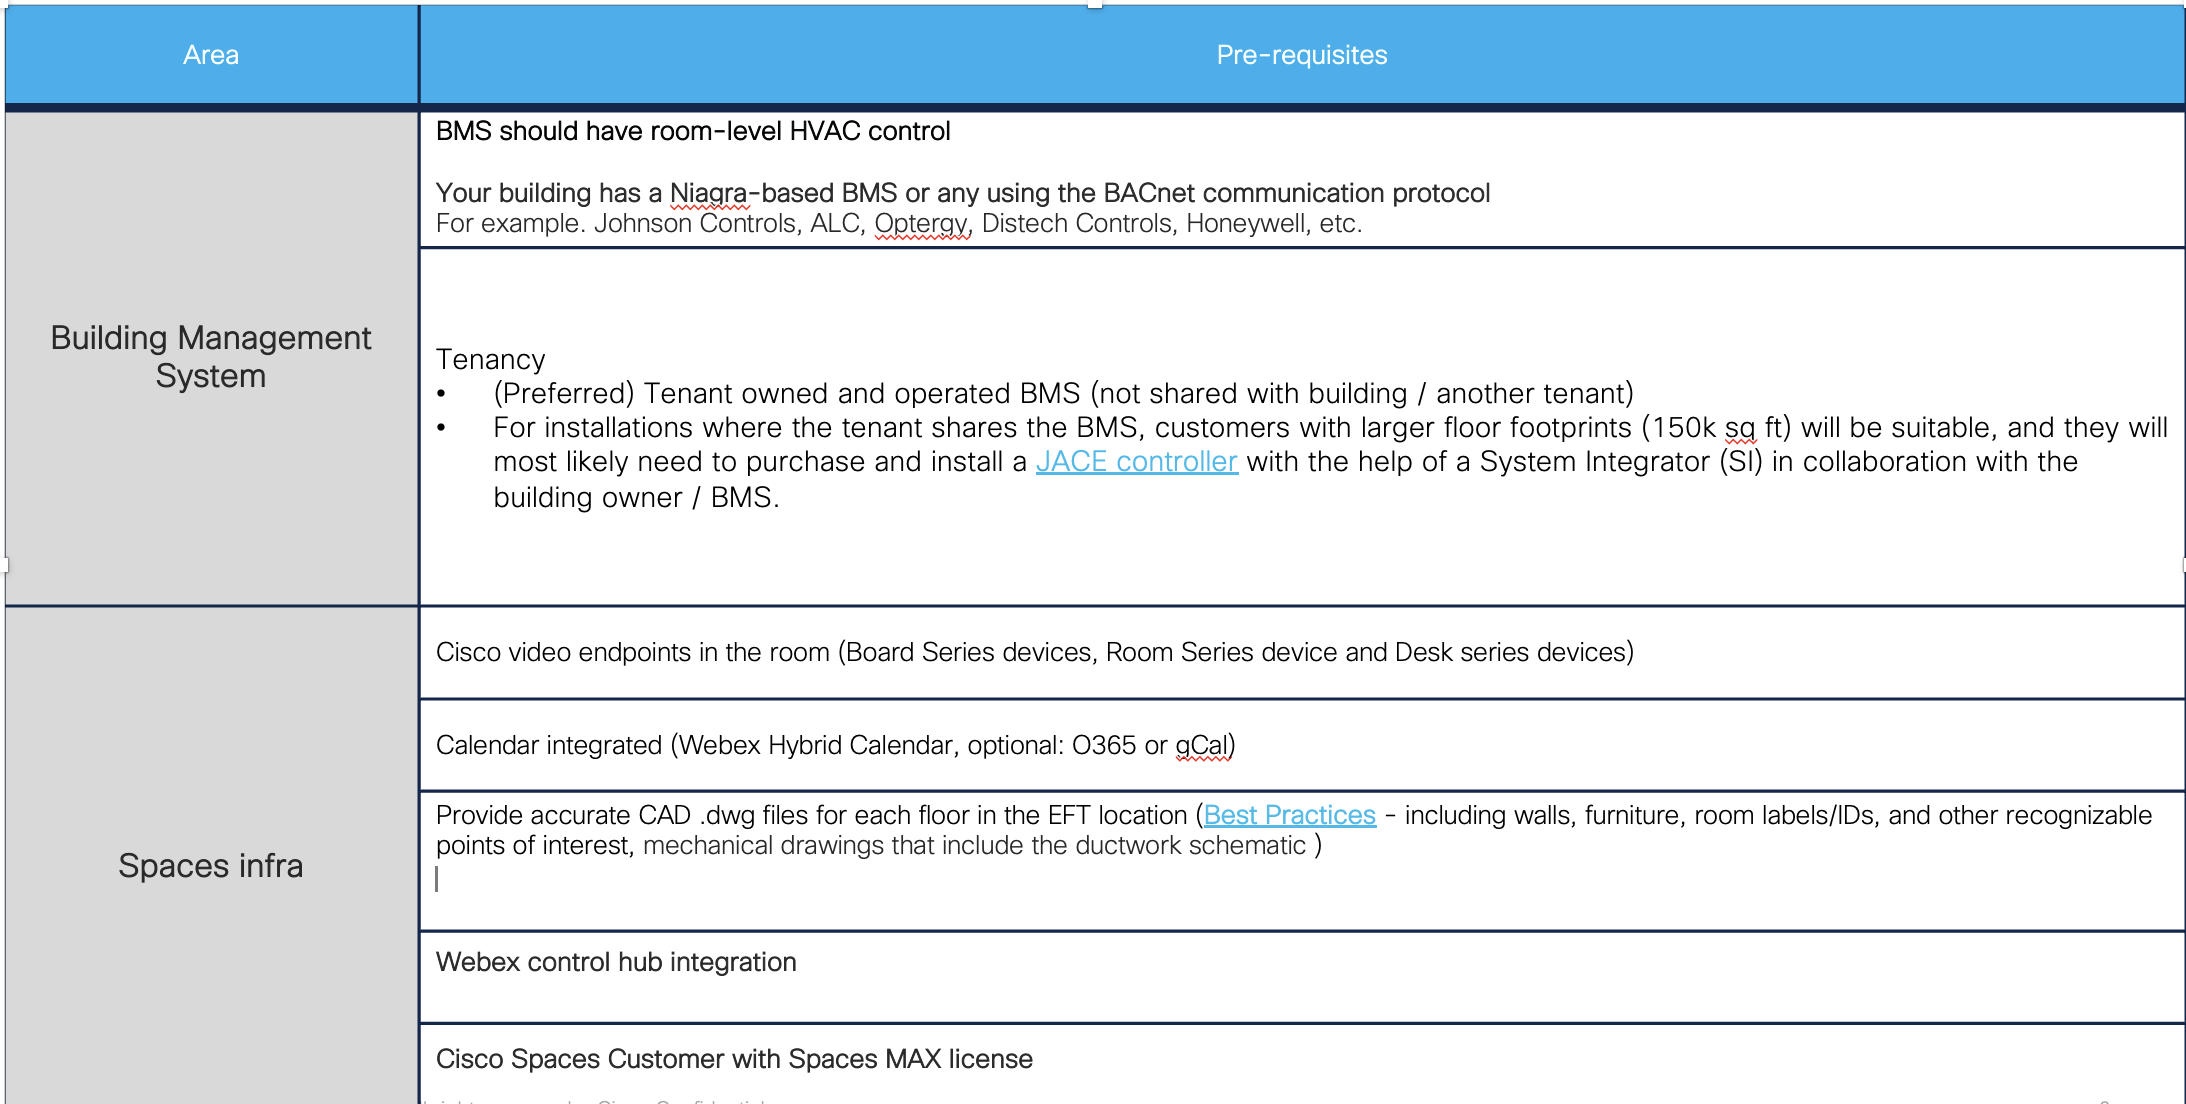
BMS Pre-deployment Checklist
Prior to site survey, a pre-deployment requirements sheet should be sent to the customer, this lists all the assets and information we will require for a successful deployment. As follows: ·
Your building has a Niagra-based BMS or any using the BACnet communication protocol
For example. Johnson Controls, ALC, Optergy, Distech Controls, Honeywell, etc.Your building has room-level HVAC controls
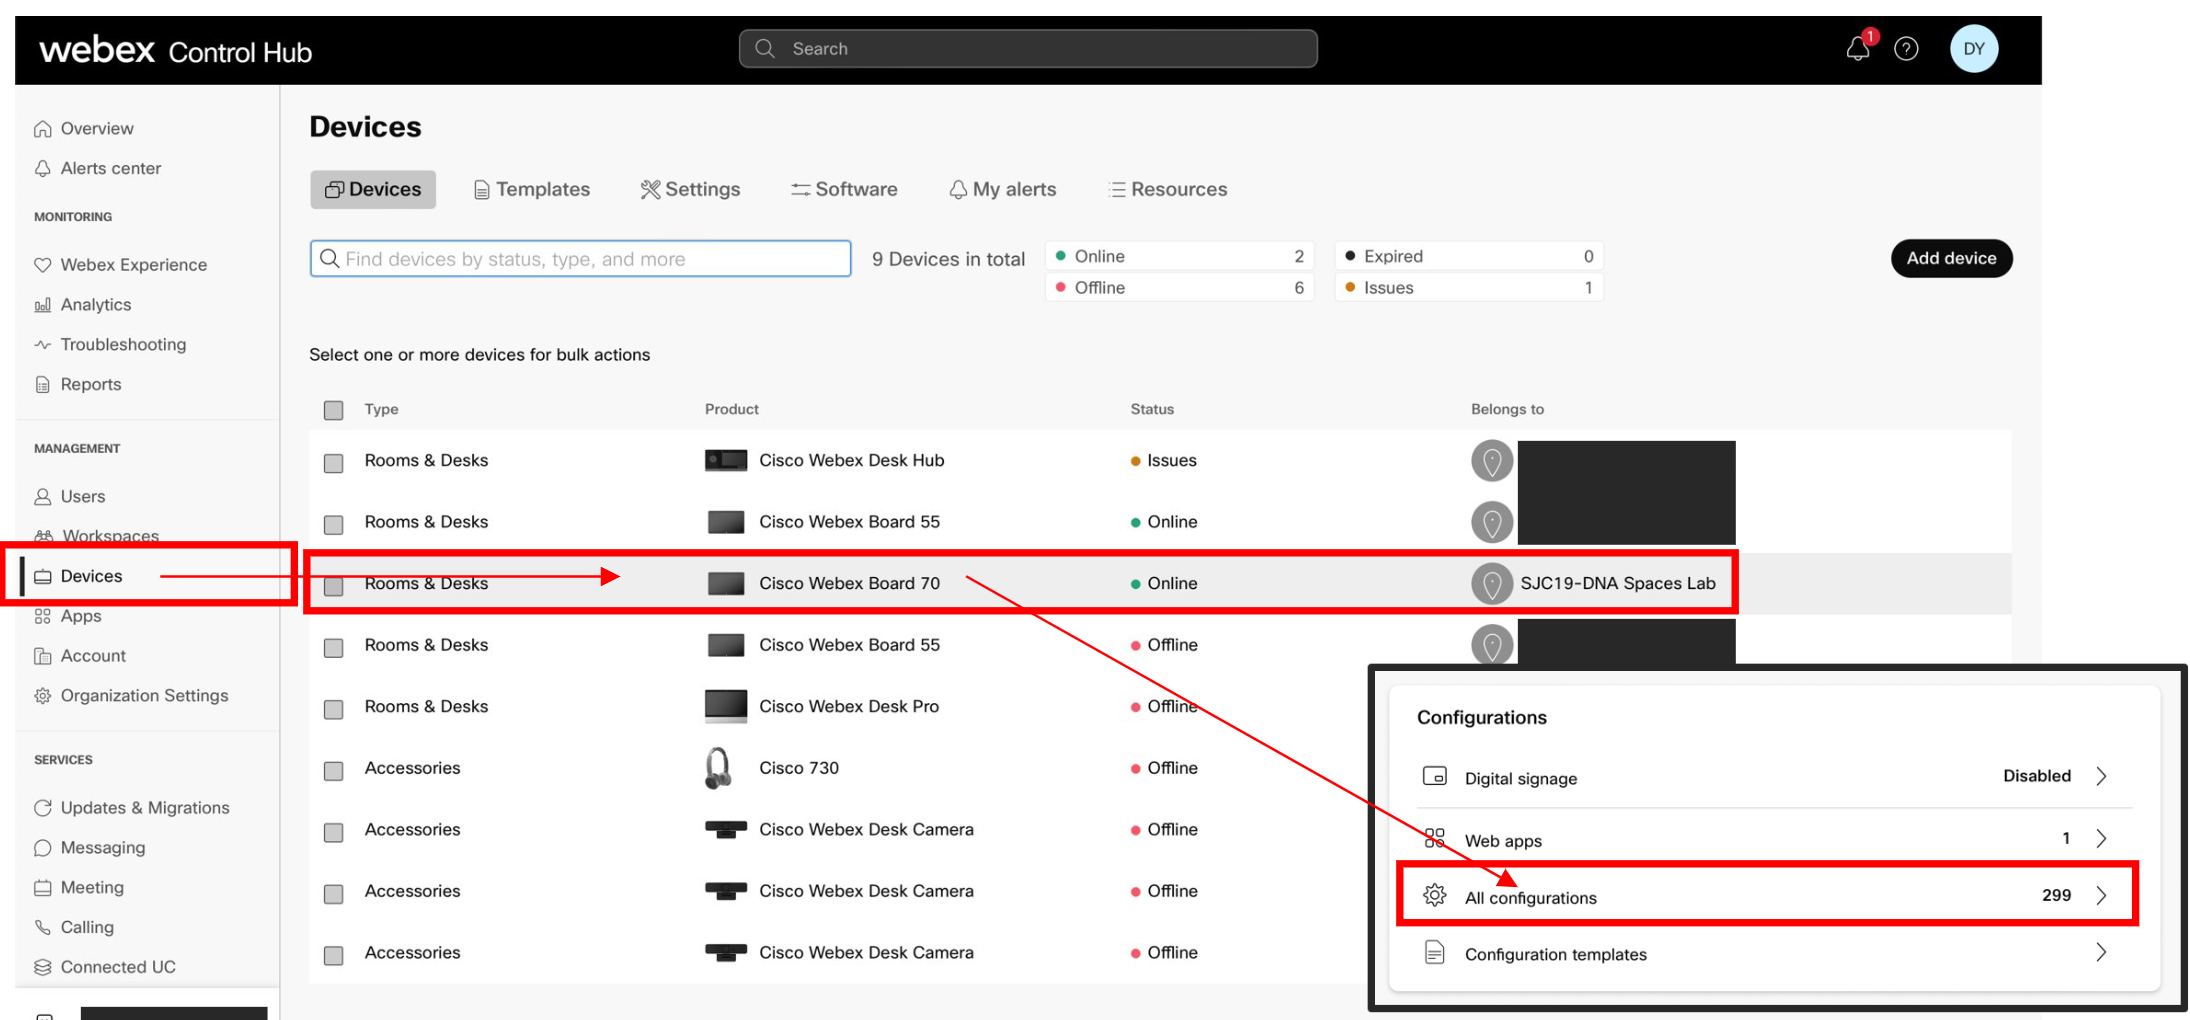
Webex Metrics
This section will illustrate how to configure the metrics in Control Hub.
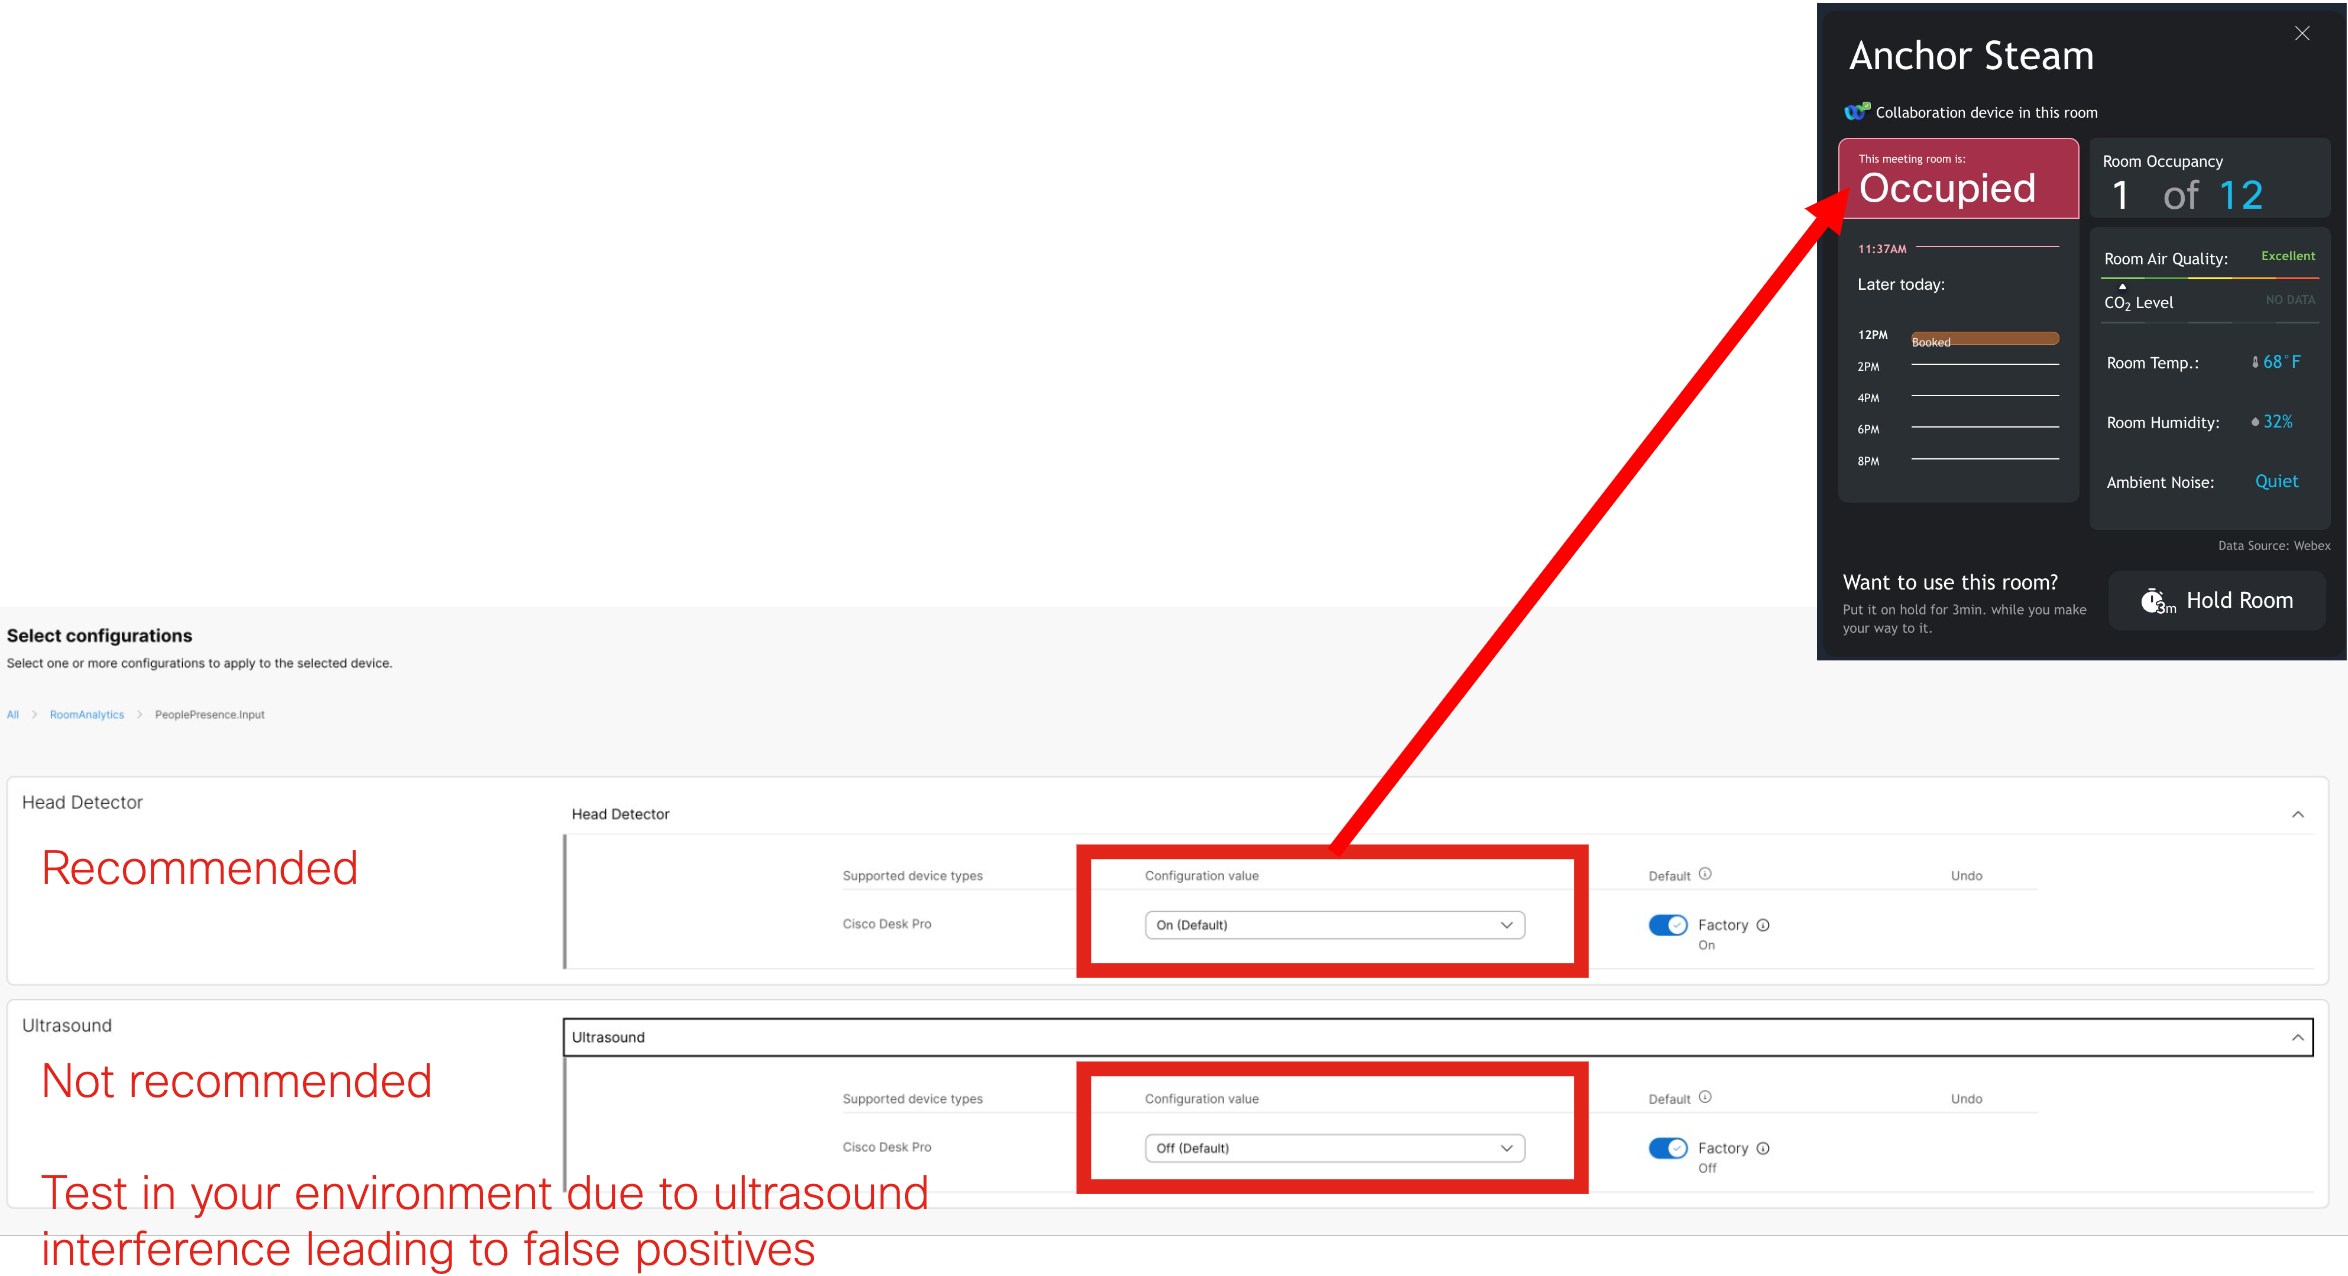
Log into Webex Control Hub, and navigate to the Devices tab.
Select devices to apply the config to, then select All configurations.
https://help.webex.com/en-us/article/nc6od6r/Historical-Data-for-Webex-Rooms-Workspaces
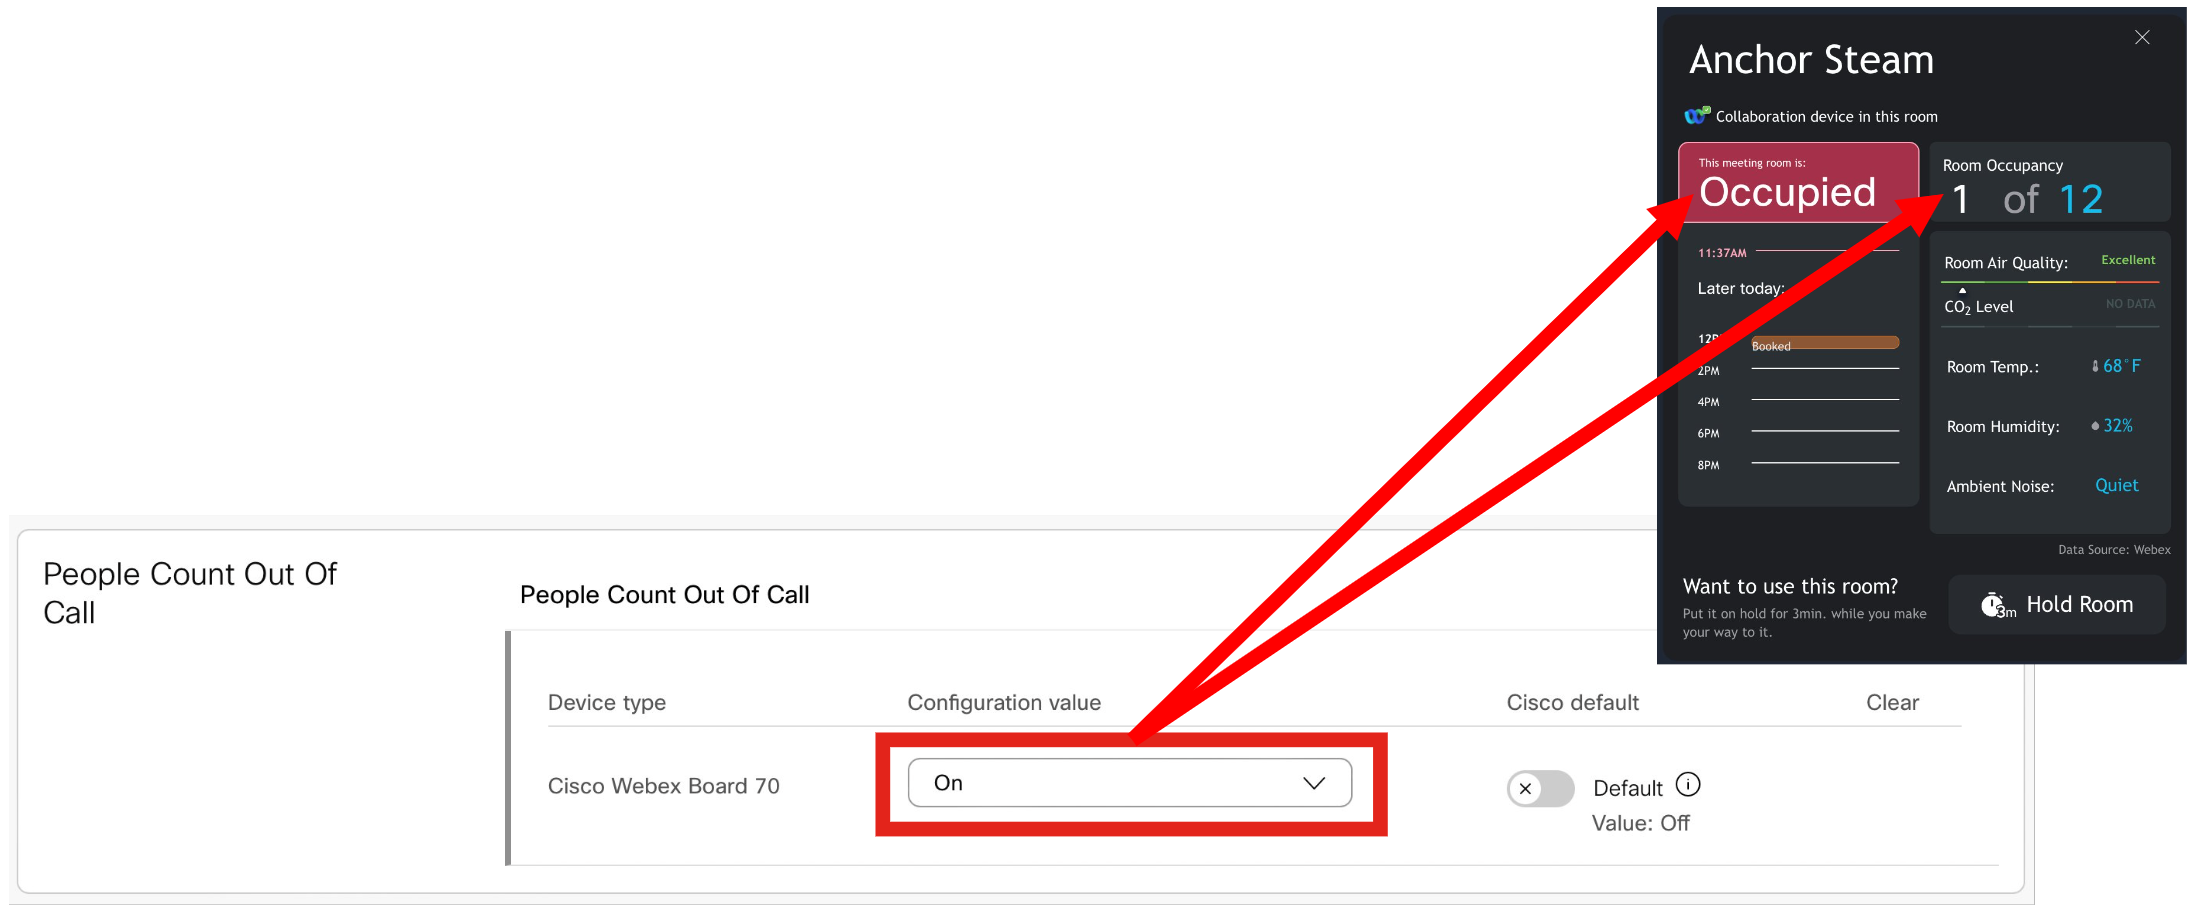
People Count Out Of Call - https://help.webex.com/en-us/article/nc6od6r/Historical-Data-for-Webex-Rooms-Workspaces
People Presence Detector - https://help.webex.com/en-us/article/nc6od6r/Historical-Data-for-Webex-Rooms-Workspaces
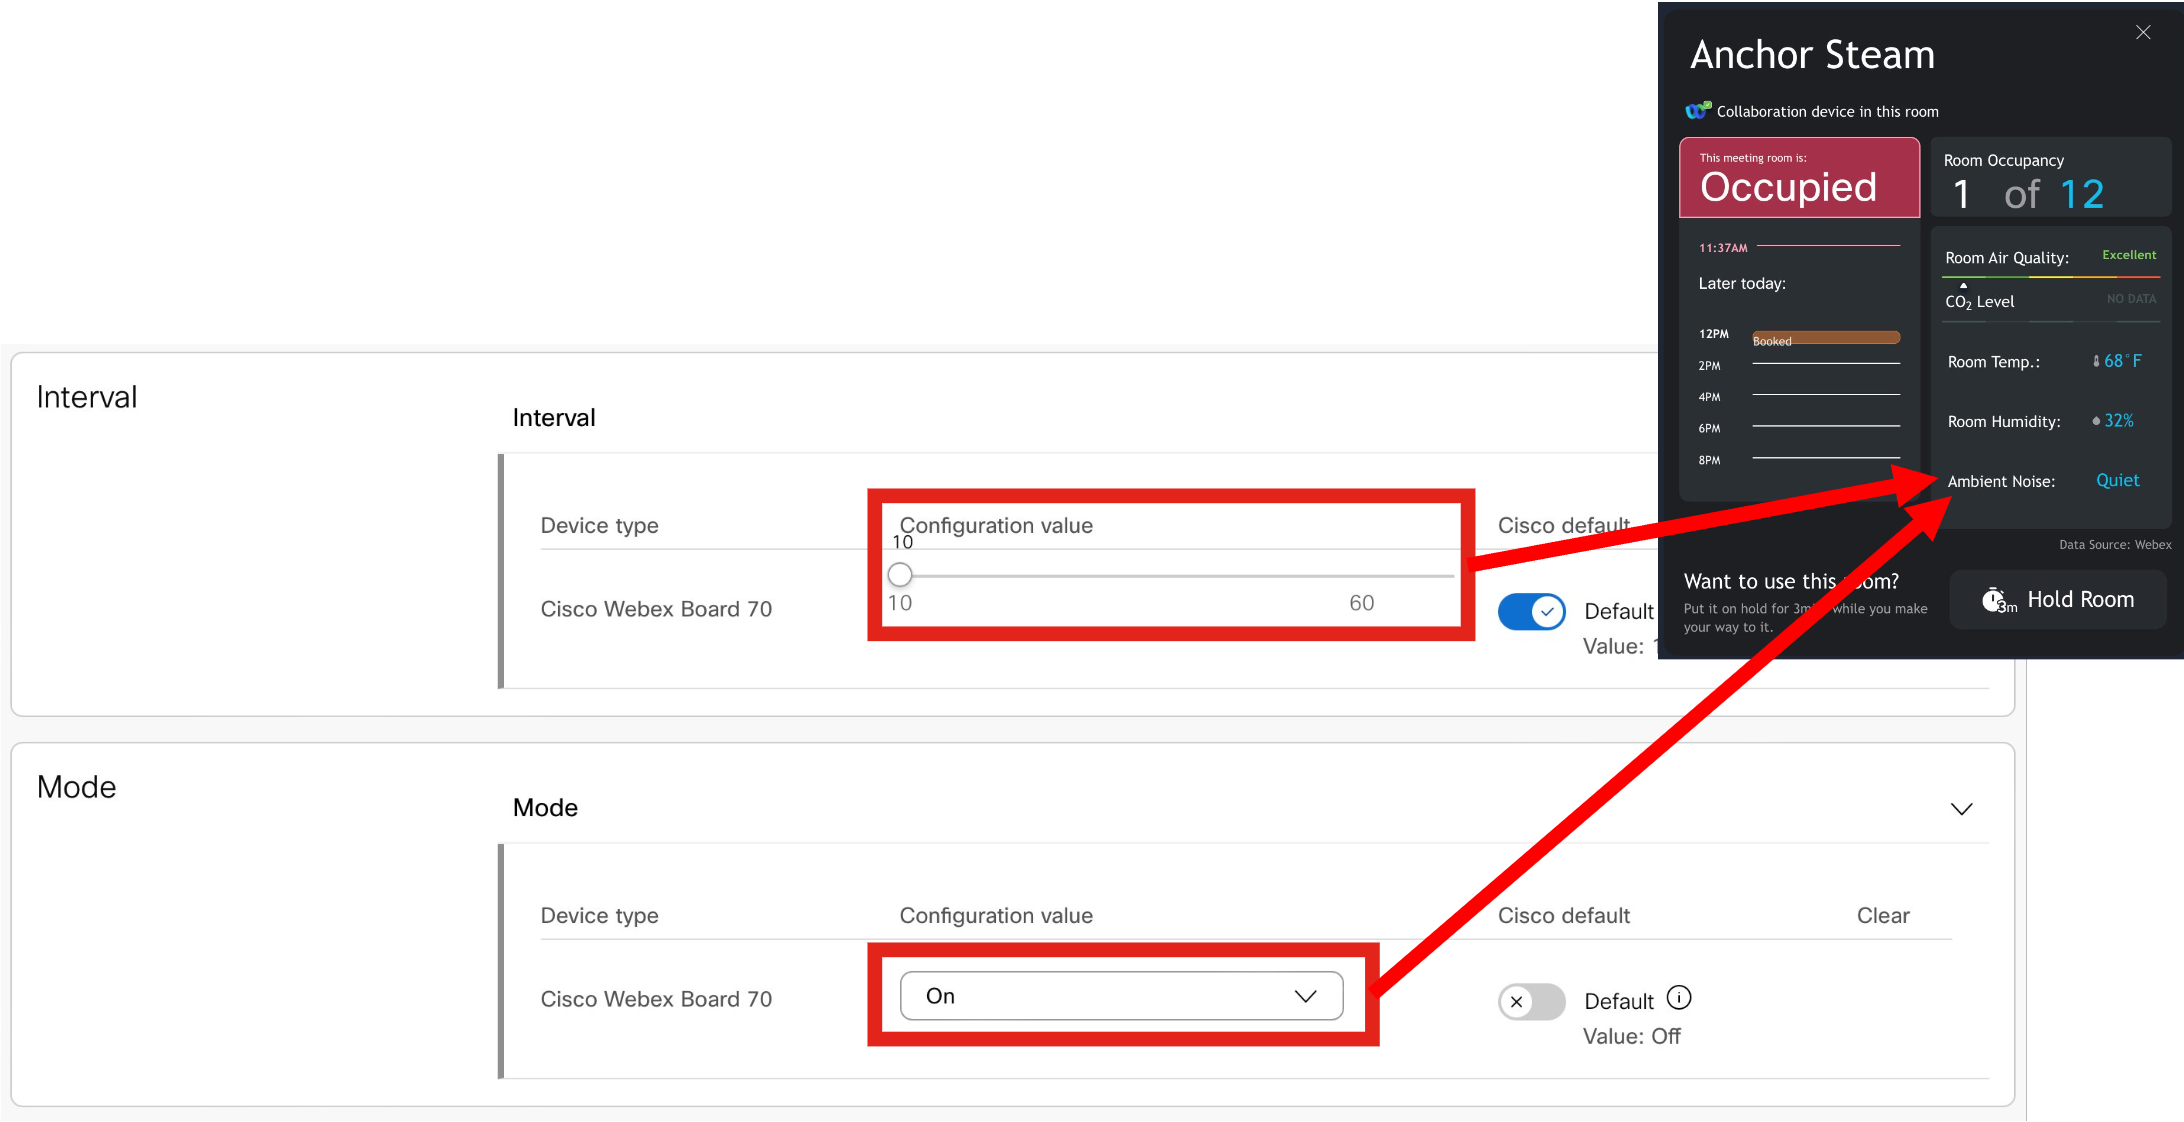
Ambient Noise Estimation - https://help.webex.com/en-us/article/nc6od6r/Historical-Data-for-Webex-Rooms-Workspaces
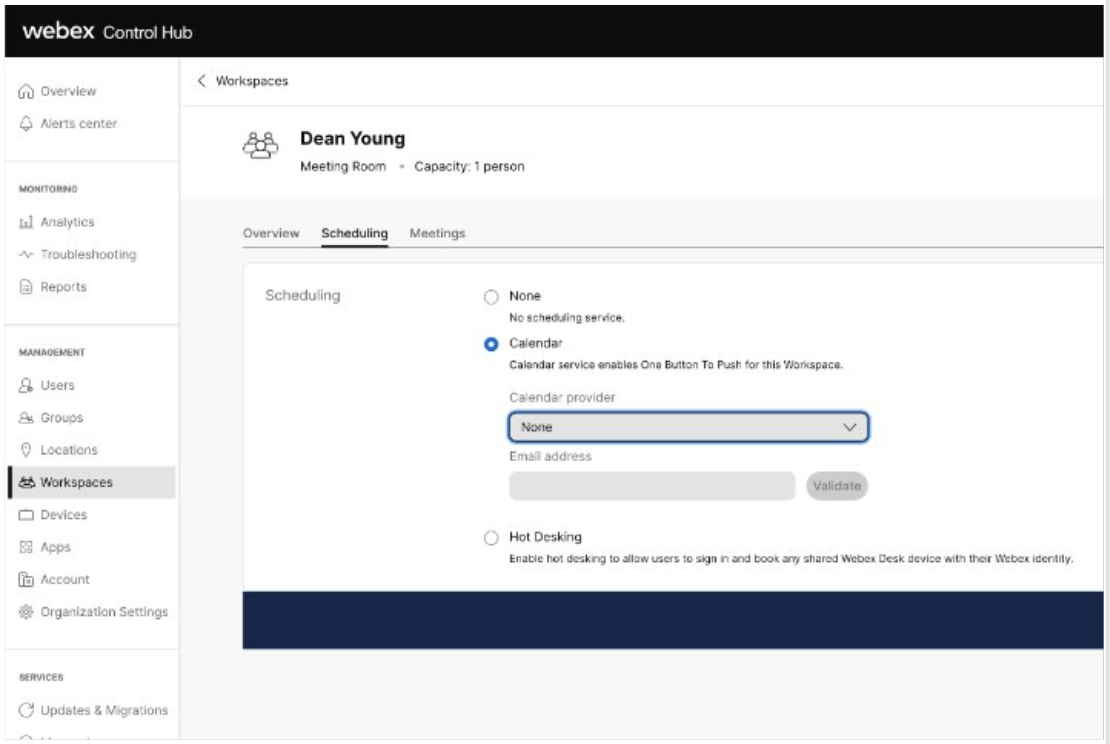
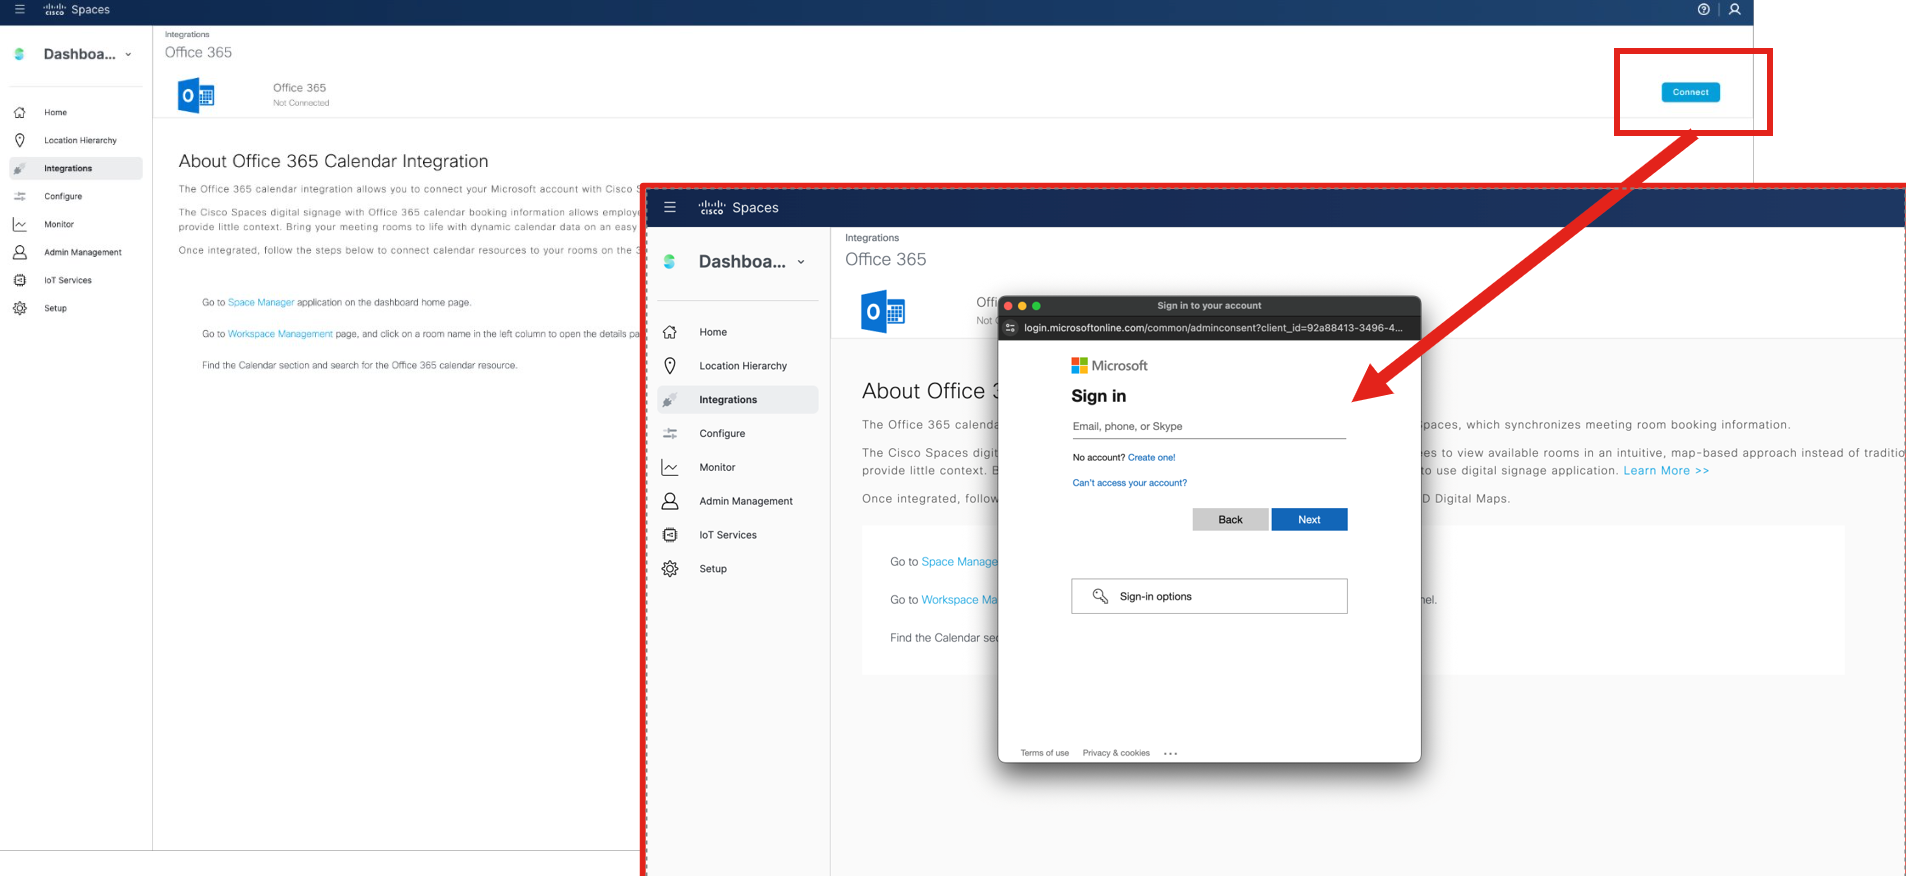
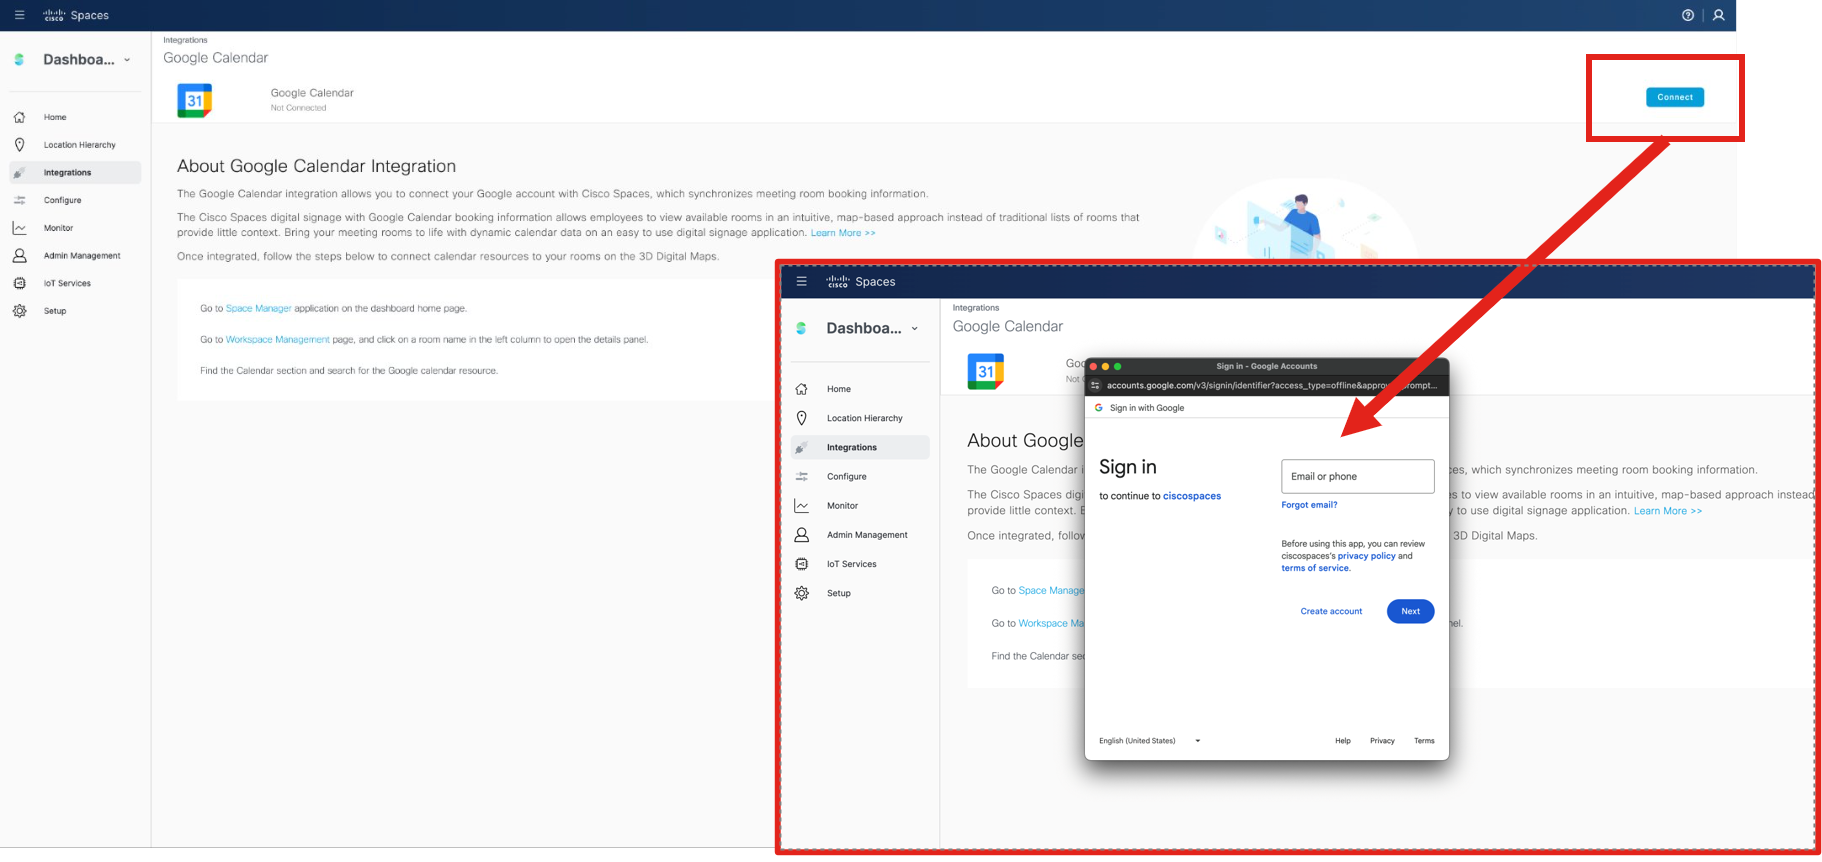
Calendar Integrations
O365 and Google Calendar options are in Webex Control Hub under: Workspaces (page) > click on a Workspace > Scheduling (tab) > Calendar (option)
Deployment guide for Hybrid Calendar
As of March 2024, the Spaces team is enhancing the Webex Hybrid Calendar integration by migrating from a polling method (every 10 minutes using REST APIs) to webhooks for real-time calendar event updates.


IMPLEMENTATION
To complete these steps, an admin will require read/write permissions within Spaces for Space Experience, as well as read/write access to Webex Control Hub.
The Smart Rooms deployment team will work with building engineer of the organization to get the answers to the questions below for the gateway onboarding.
Q: How will we communicate with the BMS? There are two options:
-or-
|
Q: If option 1) (read/write) what priority should we write at? |
Q: In order to prevent conflicts, what IP address and BACnet ID can be assigned to the Spaces Smart Room Gateway |
Q: Is there a VLAN? |
Q: Do you use a BBMD? |
Q: What BMS do you use? |
Q: How old is your BMS? |
Q: Can you expose all BACnet equipment or do you need to limit exposure with a JACE or similar Niagra 4 device? Limiting devices may be required if the building has multiple tenants, for example. |
Q: Do you have a JACE or other Niagra 4 device in place currently? |
Q: What network is your BMS on? (Landlord’s/base building, Cisco, or something else?) |
Q: Who supports/ manages the BMS? Please provide a Point of Contact name, and contact information |
Q: What mechanisms are in place for room by room HVAC? (VAVs, fan coils, chilled beam, etc...) |
Q: Can your BACnet instance support a polling frequency of once per minute/device? If not, what polling frequency can your instance support? |
Q: Do you have any issues with the existing BMS, for example: latency, controllers offline or frequently unreachable, etc...? |
Site Survey and Preparation
Site Survey
As part of the EFT and initial onboarding process, it is best to perform a site survey to validate the space can support Smart Rooms technology. Preferably this would be done remotely with the on-site building engineer. During the site survey all the rooms should be visited to confirm they have dedicated ventilation, they are closed spaces (no half walls), and that they have dedicated ducts (no underfloor shared plenum). Additionally during the site survey the cabinet for the Spaces Building Gateway should be identified and validate if the necessary connections and power are available.
Walkthrough of the rooms
Photos
Validate conditions against plans
Identify location of sensors and equipment
Identify issues that would impact effectiveness of product (e.g room has no ceiling)
Check the location and readiness of server cabinet
WAN and LAN connection
Power
Meet with building engineer
Review SOO and integration plan
Validate deployment process and plan
Add Building to Smart Rooms
Roles and Responsibilities
Cisco Spaces Admin to complete this step
WPR Engineering lead or Workplace IT team
Cisco Space Admin to invite Building Engineer
Configuration steps
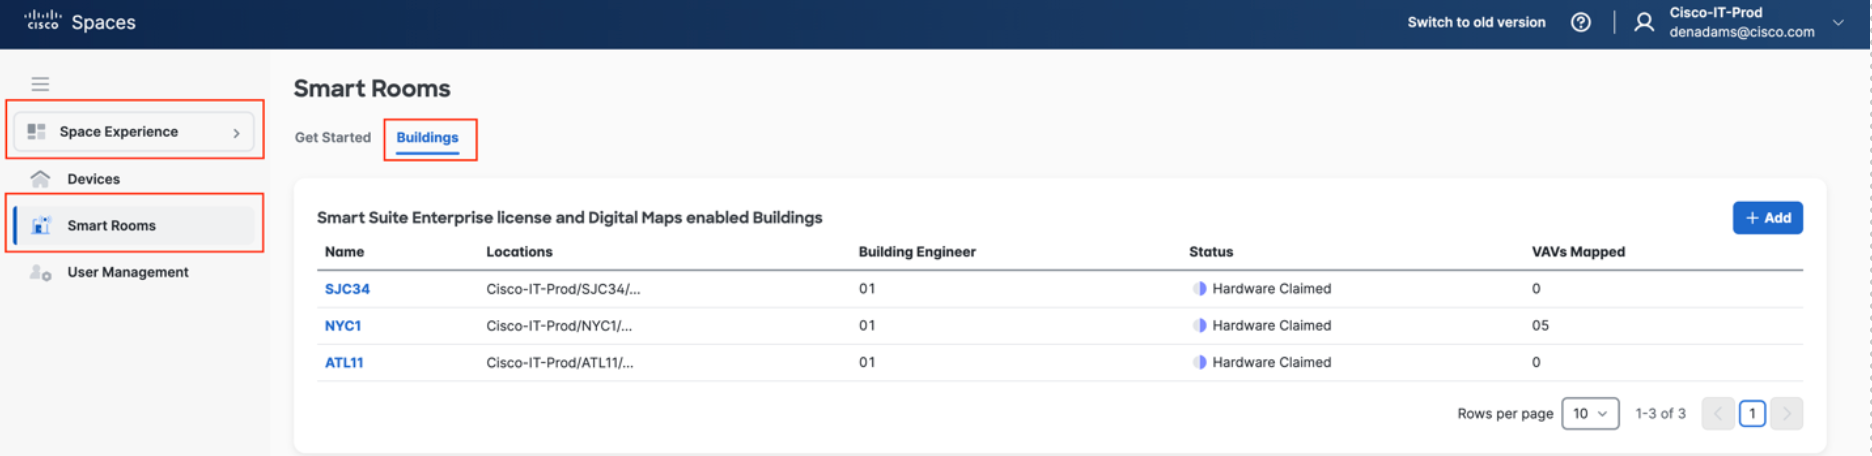
In the Cisco Spaces dashboard, navigate to Space Experience
To add a building - Select Smart Rooms> +Add
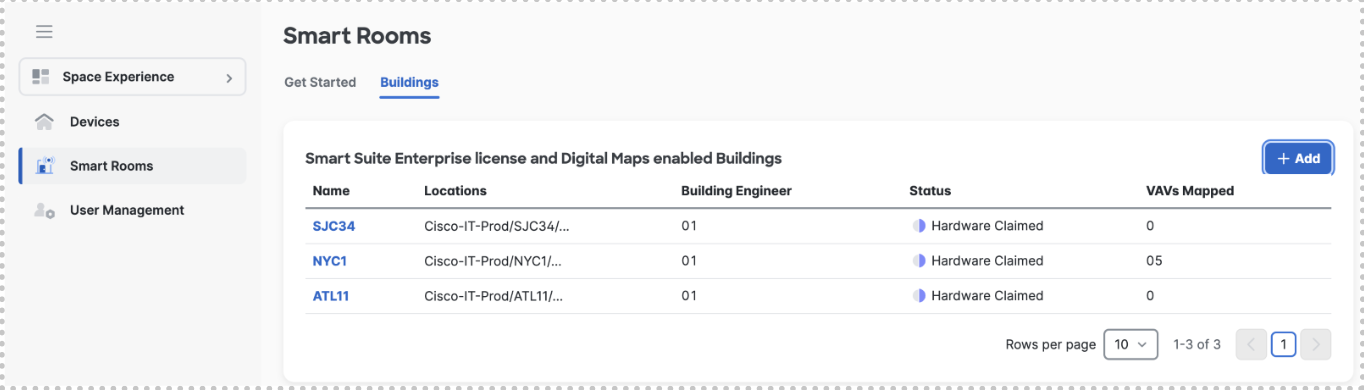
Select the building from the drop down list
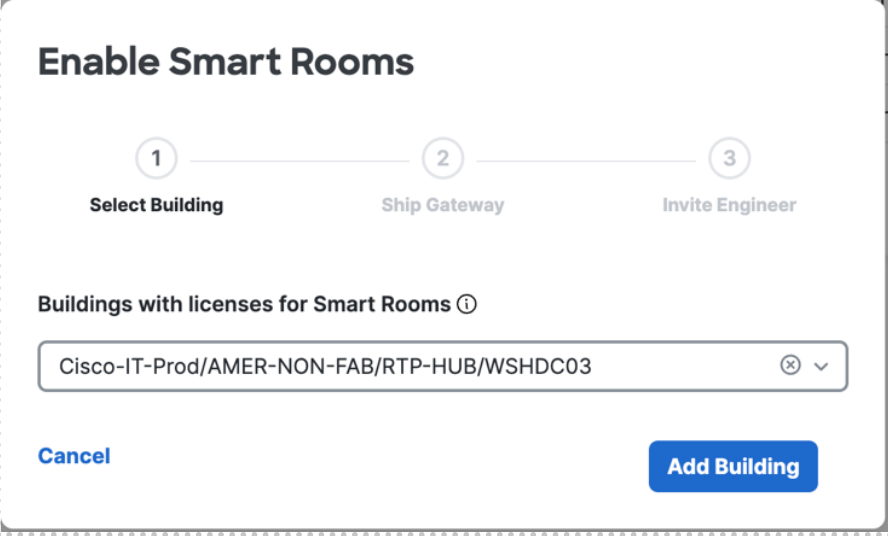
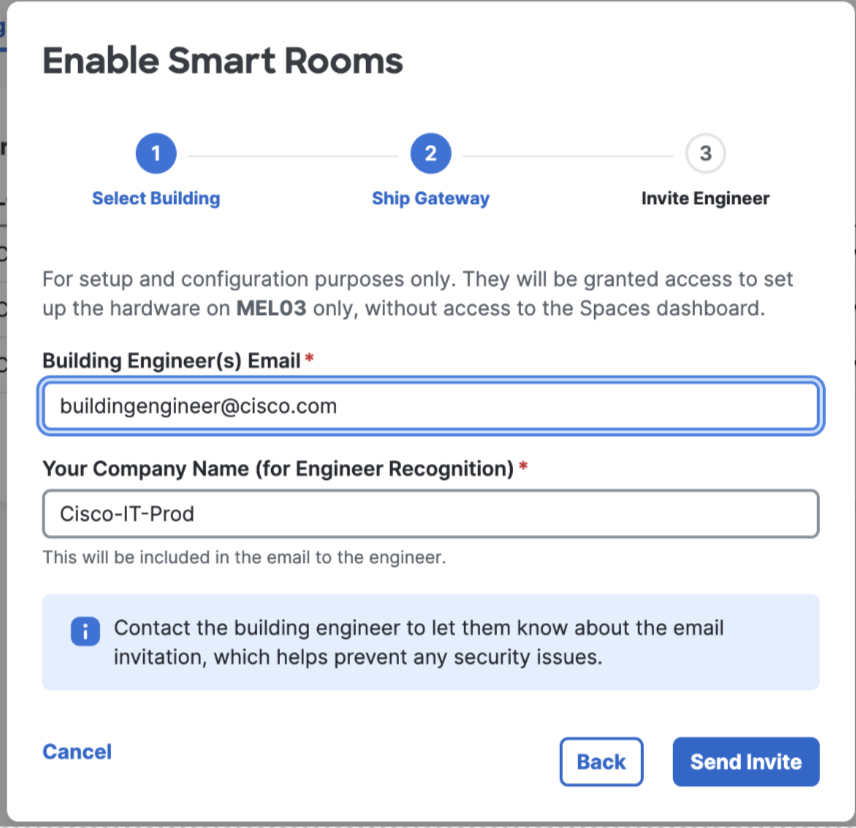
Select ship gateway
Invite Building Engineer – Questions around this access and control of who can invite
Building Gateway Registration
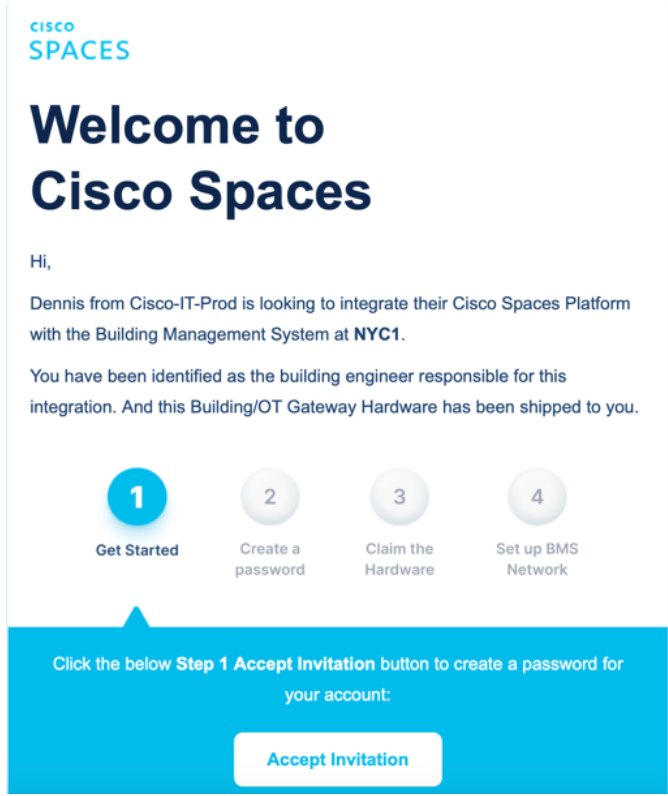
Claim and Register Building Gateway
Building Engineer accepts invite and logs into Building Gateway Manager – Building Gateway Manager has no other access to Cisco Spaces applications
Select +Add Gateway
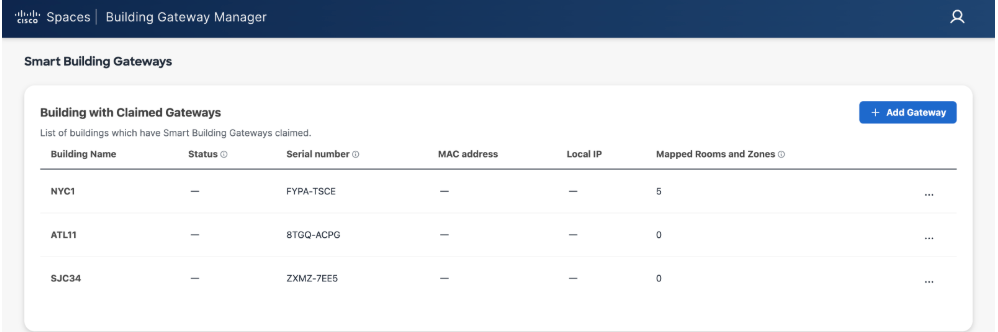
Choose the building you want to add gateway to from list
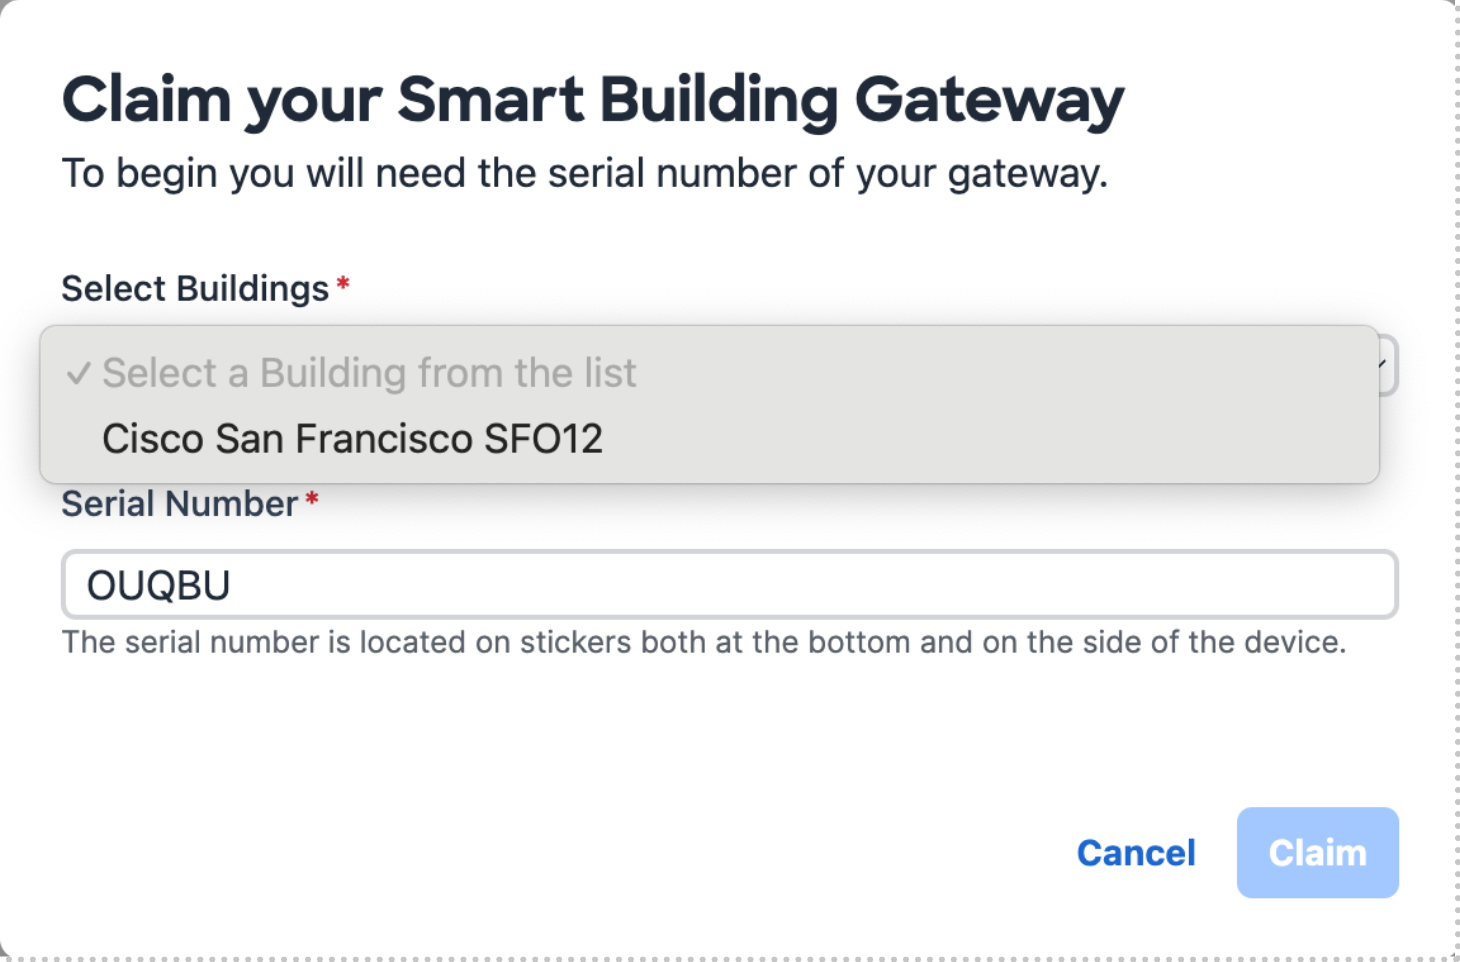
Enter Serial number and select Claim
Confirm the new Building name and gateway serial number populated in the list of enabled sites

Building Gateway Installation
Overview
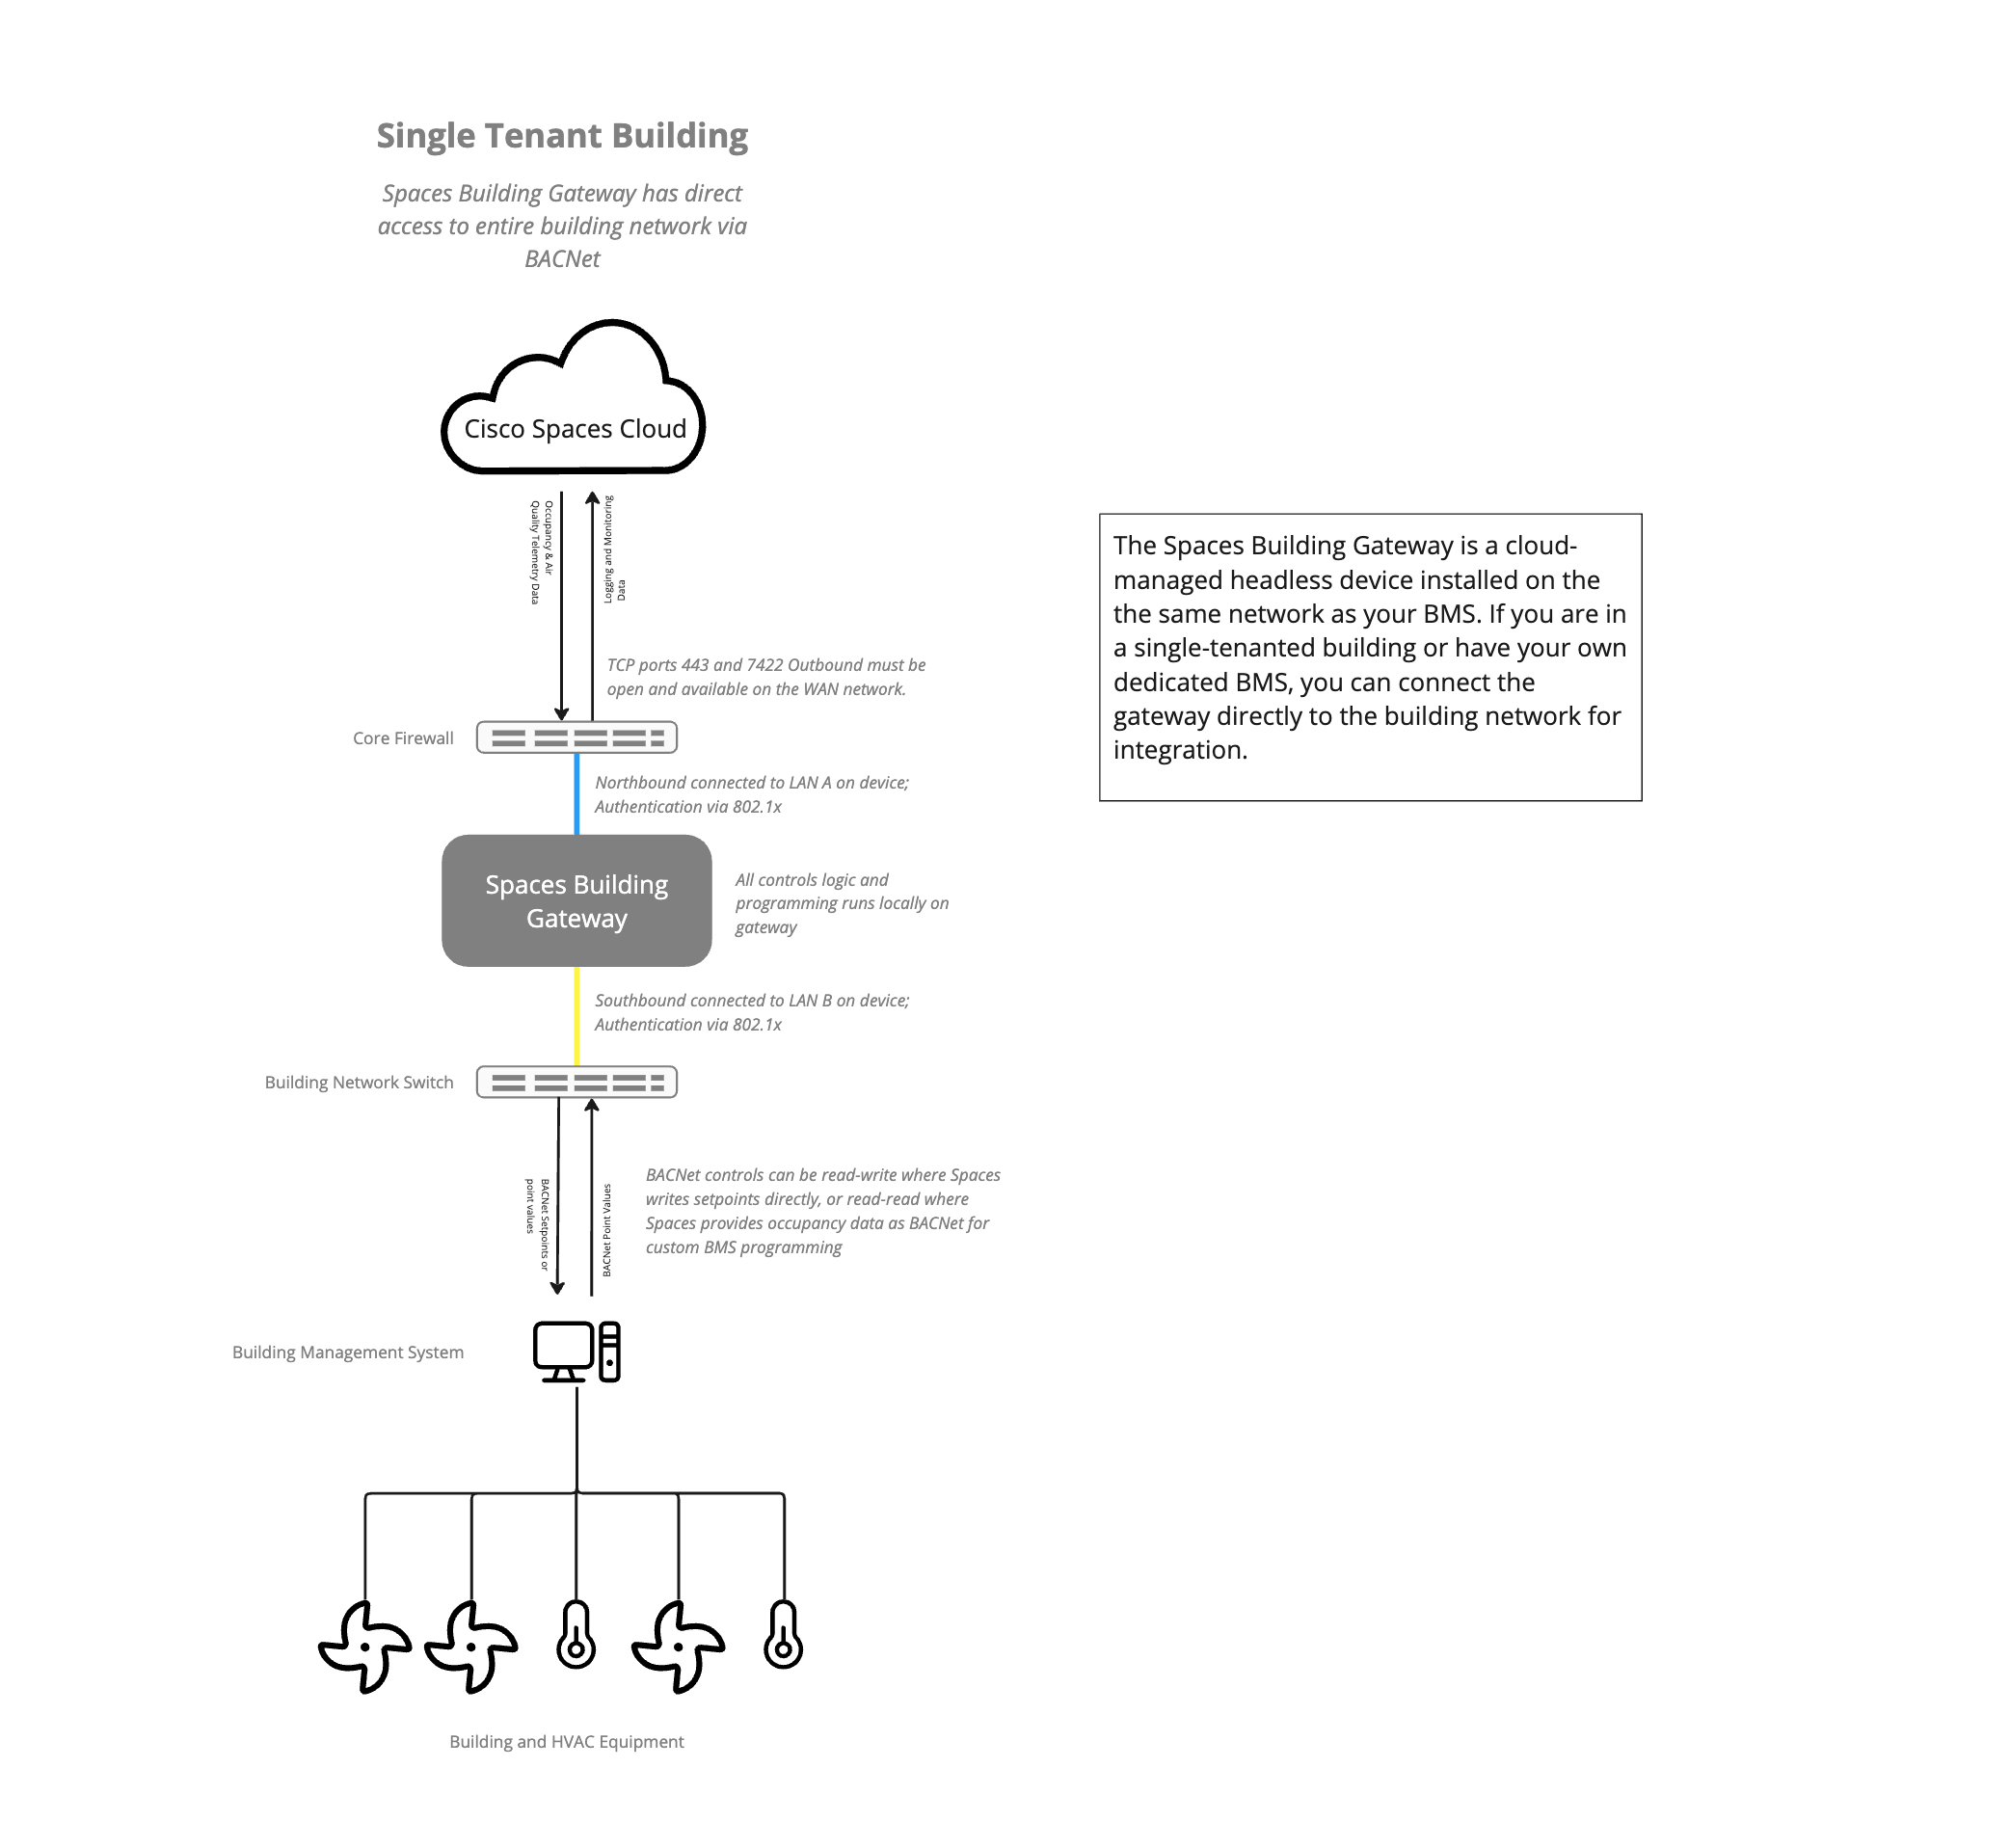
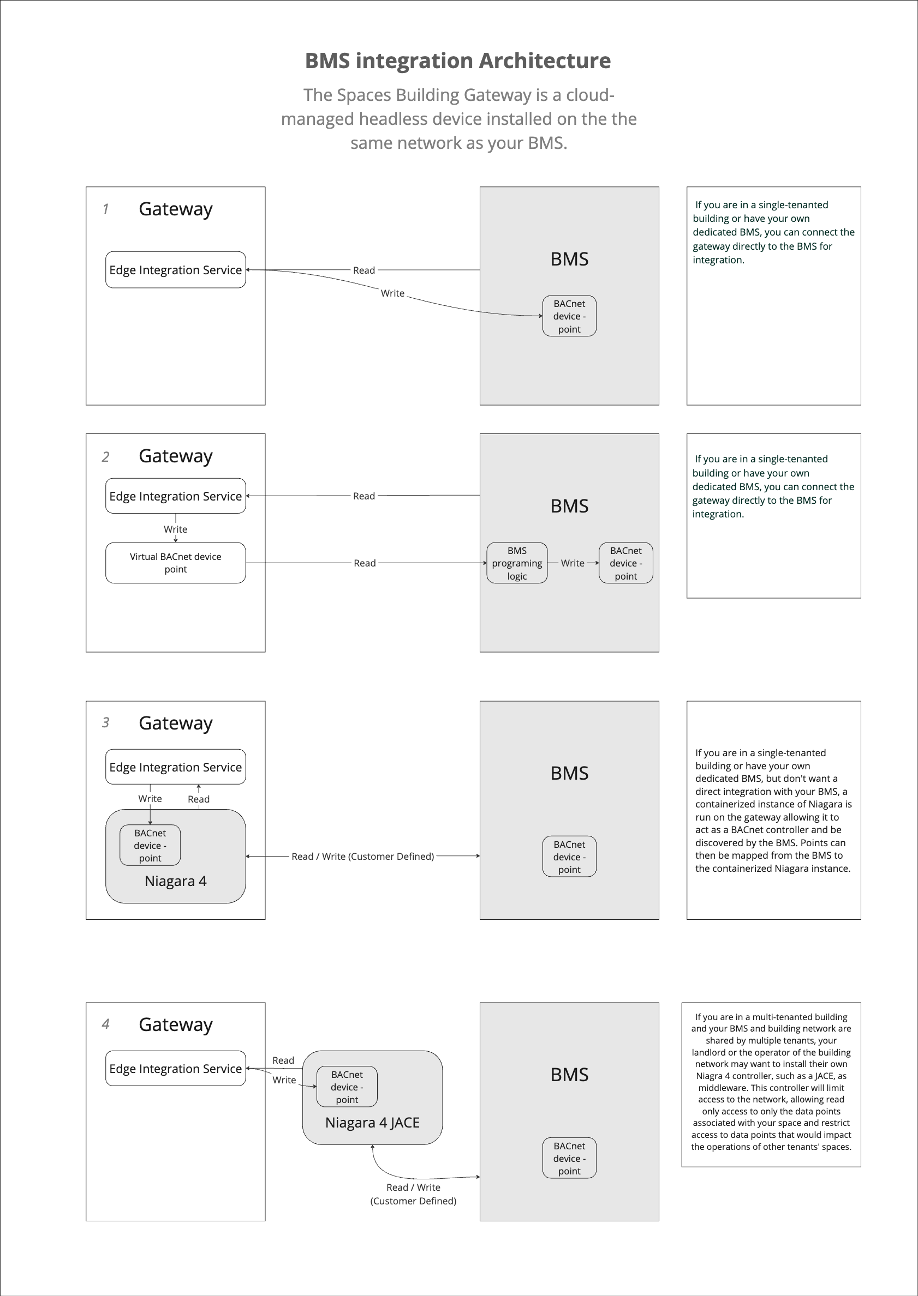
The Cisco Smart Rooms gateway connects to the building or OT network to communicate directly with the building management system (BMS) and endpoint controllers (e.g VAVs and thermostats). The gateway receives occupancy and IAQ sensor telemetry data from the cloud, processes that data at the edge along with data coming from the BMS, and sets BACNet setpoints or makes available read-only BACNet points to the BMS network for control (see BACNet Integration below for more detail)
The Cisco Spaces Building Gateway is a cloud-based platform that securely connects on-premises building management systems (BMS) to the Cisco Spaces cloud to enable Cisco Spaces Smart Rooms solution.
For deployments there are two recommended reference architectures:
Single Tenant: If you are in a single-tenanted building or have your own dedicated BMS and building network, you can connect the gateway directly to the building network for integration.
Multi Tenant: If you are in a multi-tenanted building and your BMS and building network are shared by multiple tenants, your landlord or the operator of the building network will likely want to put in a JACE controller as middleware. This JACE controller will limit access to the network, allowing read and write to only the data points associated with your space and restrict access to data points that would impact the operations of other tenants' spaces.

If the deployment is in a multi-tenant building or the building owner does not want to allow access to all BACnet devices in the site, a JACE or similar Niagra 4 controller needs to be installed by the customer. This must be done with their system integrator. Share the list of BACNet points above with the system integrator to ensure they are exposed. The JACE device is a pre-requisite for future steps.
Network Configuration & Security
The Smart Rooms gateway requires 1) a connection to the internet (WAN) with TCP port 443 and port 7422 outbound available and 2) an IP connection to the building network (LAN) with the appropriate BACNet port (typically 47808 by may vary depending on customer) open for both inbound and outbound.
Connections on WAN and LAN can be via static IP or DHCP. Authentication to the WAN and to the LAN can be configured via 802.1x authentication for additional security.
Requirements for the Gateway Installation :
Power
The Cisco Spaces Building Gateway needs a regular 110 or 220-volt outlet to power it.
Enterprise Authentication configuration
MAC authentication Bypass (MAB) will be required for Building gateway WAN, LAN and service MACs in order for the Building gateway to connect to the cloud and BMS server on the LAN network. The following MAC addresses will be provided by the Spaces administrator for MAB authentication:
WAN interface MAC:
LAN interface MAC:
BMS Edge Service MAC:
Troubleshooting services MAC:
802.1x coming soon.
Wired connectivity
The WAN interface needs to be connected to the switch port that has outbound 443 internet access and the above domains listed as allowed domains for connectivity.
LAN interface (port B) needs to be connected to the same switch where BMS server is connected and it needs to be on the same VLAN as BMS server to ensure BACnet UDP communication is established between the Building gateway and BMS server.
WAN connectivity
TCP port 443 outbound and port 7422 outbound must be open and available on the WAN network. The Spaces Building gateway needs to establish an outbound TCP 443 connection to the following URLs and IPs for management plane connectivity
Nodev3.iotium.io: This is our cloud end-point for Secure Edge connection.
Checkip.amazonaws.com: For DNS validation of nodev3.iotium.io and geolocation of iNode public IP.
*.google.com: For NTP.
*http://docker.com and *.docker.io: Required for Building Gateway Edge Applications, including internal services, and troubleshooting tools.
44.202.124.117: our virtual building gateway headend in AWS cloud where the secure tunnel is established for all OAM communication. (Post EFT phase there will be virtual gateways in different regions, each of which will have a unique IP address, for now all regions will use the North American IP)
Region | IP address |
|---|---|
North America | 44.202.124.117 |
For static WAN configuration, please have the following information ready:
DHCP or Static
If Static - WAN IP Address
Default Gateway
Network CIDR (Subnet Mask)
Optional Configurations
Proxy
FQDN
Port
DNS Servers (optional, if not provided will use Google default name servers)
Server 1:
Server 2:
Server 3:
NTP Servers (optional, if not provided will use Google default time servers)
Server 1:
Server 2:
Server 3:
Server 4:
LAN connectivity
The LAN interface needs to be connected on the same switch where the BMS server is connected and authenticated via MAB. The Cisco Space Building Gateway needs a reserved IP address in DHCP.
For multi-tenant installation: If there is a JACE box that has tenant BACnet points mapped as a tenant BMS gateway then connect the network port of the JACE to the LAN interface of the building gateway (LAN B) and configure the static IP using the building gateway cloud console.
For LAN configuration, please have the following information ready:
DHCP or Static
Network CIDR (IP and Mask Length)
Spaces Building Gateway IP address
Optional
VLAN enabled
VLAN ID
BMS Edge service configuration
In order to configure the BMS Edge Service you will need the following:
IP address and BACnet instance number from the BMS contactor
The BACnet UDP port number (if different than default port 47808)
The device ID for the building gateway as configured in the BMS for points binding
Provide the BMS Edge service IP address to the BMS contractor to on-board the building gateway as a BACet Device
Configure for BBMD if needed
Spaces cloud connector for edge service configuration
TCP port 443 Outbound must be open and available on the WAN network. The Spaces cloud connector needs to establish an outbound TCP connection with the spaces microsite.
TCP port 7422 outbound must be open and available on the WAN network. The Spaces cloud connector needs to establish an outbound TCP connection with the spaces cloud.
BACnet Onboarding
BACnet Integration/Onboarding
Cisco Smart Rooms control heating and cooling by adjusting setpoints on HVAC devices via BACnet. There are two approaches to BACnet integration: either a read-write or read-read.
Read-write:
The Cisco Smart Rooms system can read temperature and flow BACNet points from the BMS, and combine that data with information from Cisco Spaces regarding occupancy and room schedules, and make direct changes (write) to the HVAC systems by writing heating and cooling setpoints directly to the BMS. The priority is configurable.
Read-read:
The Cisco Smart Rooms system can make occupancy and scheduling data available by writing to a pseudo BACnet device which your BMS reads and actions on based on your own rules and logic. The customer’s system integrator will need to perform additional programing in this case.
For integration the customer needs to make BACnet data points available to the Cisco Spaces building gateway.
Typical Available BACnet Points (for VAVs)
Point | Equipment Type | Abbreviation | Typical Value | Writable Point |
Schedule | VAV | SCHED | 0 or 1 | X |
Space Temp | VAV | ST | Varies |
|
Occupied Cooling Setpoint | VAV | OCSP | 73°F | X |
Unoccupied Cooling Setpoint | VAV | UNOCSP | 85°F | X |
Occupied Heating Setpoint | VAV | OHSP | 71°F | X |
Unoccupied Heating Setpoint | VAV | UNOHSP | 55°F | X |
Max Air Flow Setpoint | VAV | MAXFSP | Varies | X |
Min Air Flow Setpoint | VAV | MINFSP | Varies | X |
Space CO2 | VAV | CO2 | Varies |
|
Air Flow | VAV | FLOW | Varies |
|
Damper Position | VAV | DMPR | Varies |
|
Demand Shed Control | VAV | SHED | Varies |
|
VFD Fan Speed | AHU | VFDSPD | Varies |
|
BACnet Device Discovery
BACNet Device Discovery is the process of finding all of the devices on a BACnet network, and then the objects which are available on each device. The basic BACnet protocol for discovery is the Who-Is service; this uses broadcast traffic to request devices within a range of IDs to respond with an I-Am message.
While BACnet HPL allows sending Who-is messages directly, running a scan is faster and easier. A BACnet scan looks for all devices and creates a list of the results and generally takes just a few minutes.
VAV mapping
Configuration steps
Map Equipment
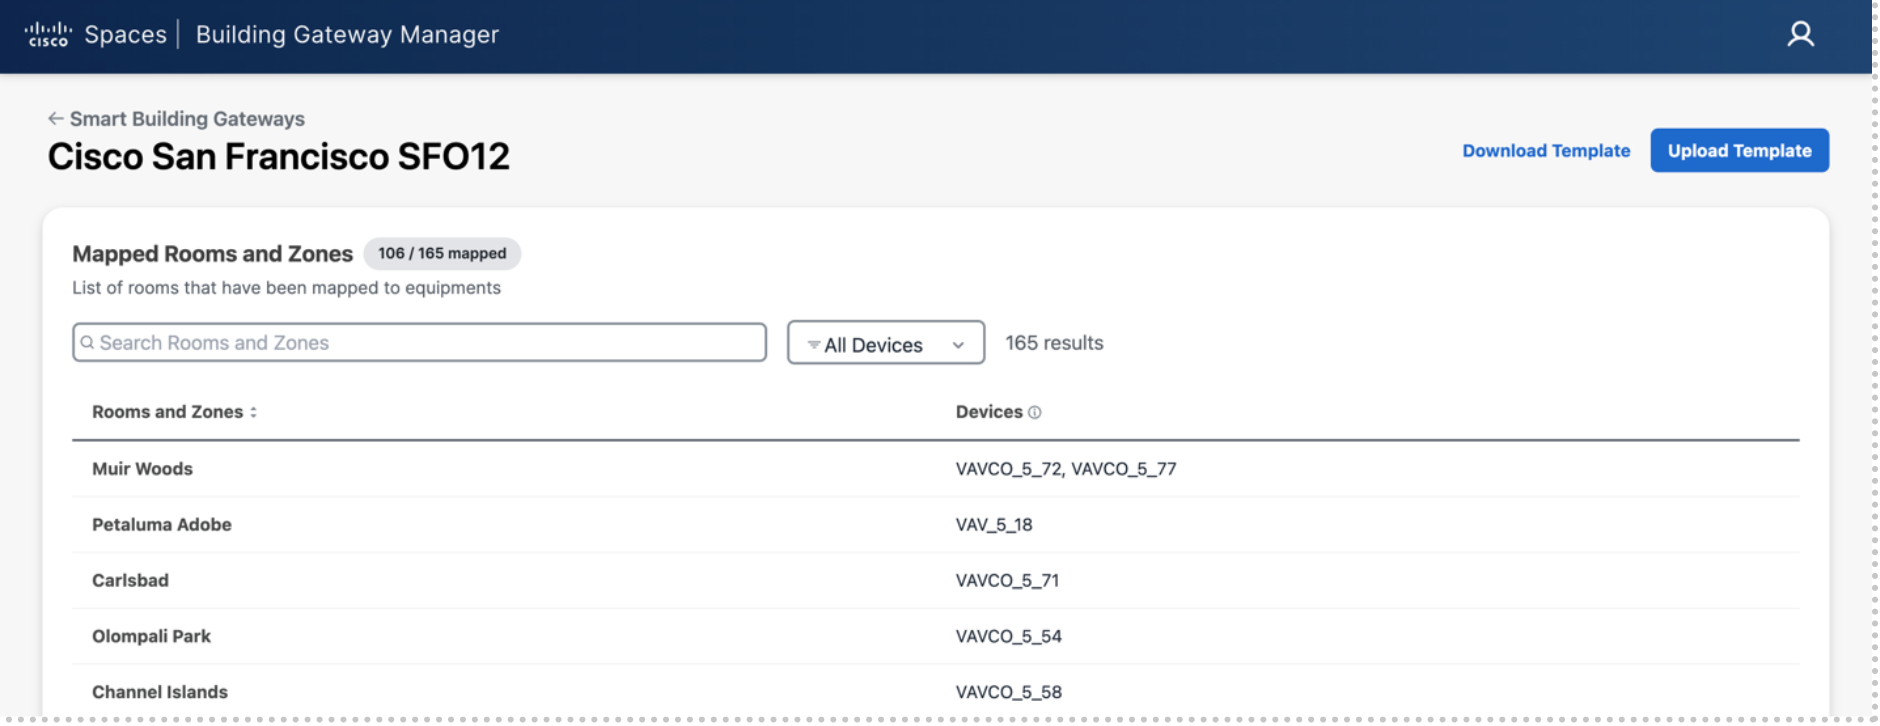
Find the building you want to map equipment to click on the ellipses button and select “Map Equipment”

On the Rooms and Zones list you will see what rooms have or do not have equipment mapped to them.
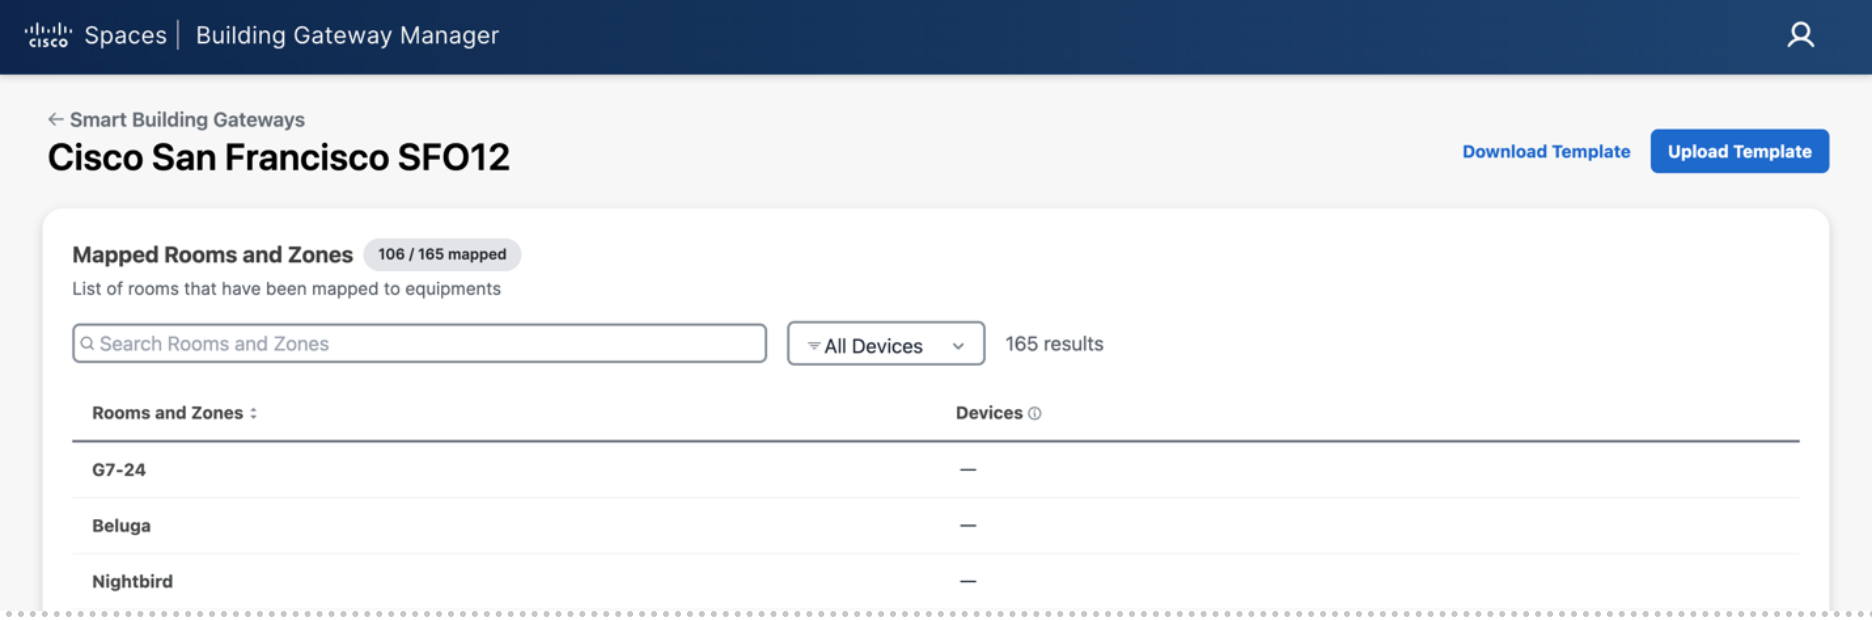
Select Download Template to start mapping

Open the Excel file template that was downloaded
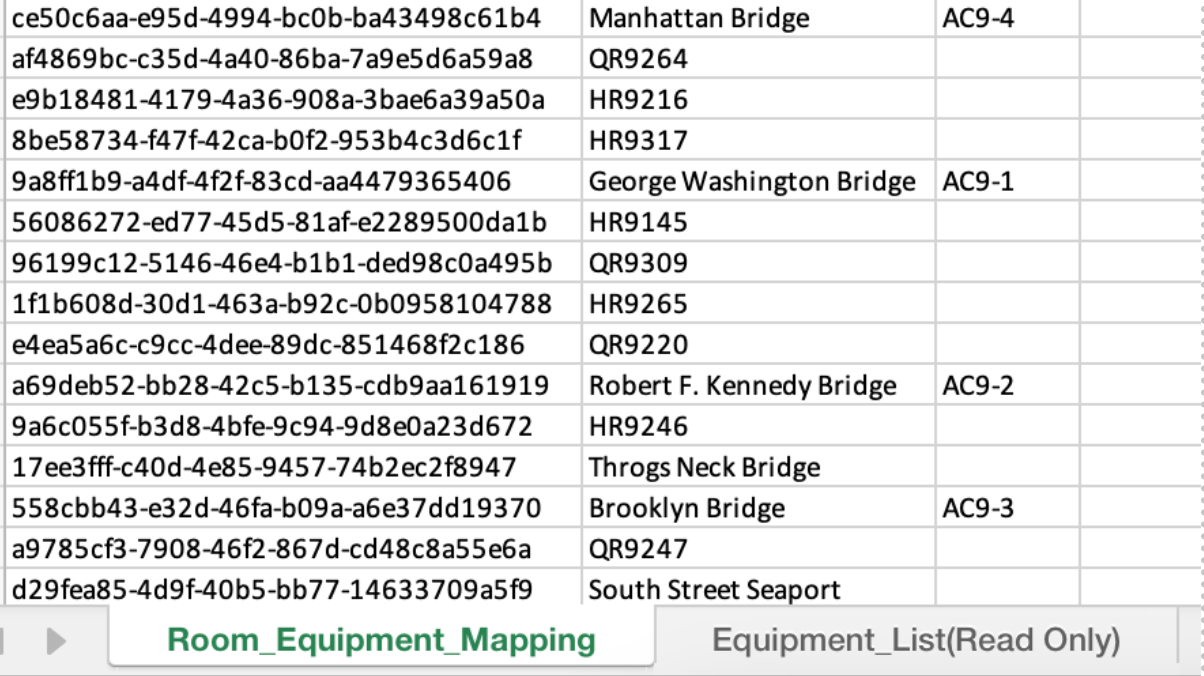
Match the correct equipment (VAV’s, FCU’s) to the corresponding room
The Room list populated from the Webex Workspaces synced from Control Hub. The equipment list is populated by the gateway via BACnet discovery on exposed/programmed points completed by the BMS controls vendor
Save the template and upload in the same location as downloaded
Confirm you see the corresponding devices associated with the correct Rooms and Zones that they were mapped to
Verify and Benchmarking
Testing & Validation - depends on the number of VAVs mapped, from minutes to days. Testing the initial connection to see if the BMS is reading each change takes only a few seconds per VAV, always performed sequentially, testing if the VAV is mapped to the correct room takes up to several minutes per test to ensure the atmosphere in the room changes as expected, always performed sequentially.)
Benchmarking - at least 1 week; 2-3 weeks recommended. . (This is the process of capturing data BEFORE we begin optimizing so we can provide an accurate optimization report.)
Activation on Webex endpoint
Enable Smart Rooms
Roles and Responsibilities
WPR Engineering Lead to enable
WPR IT involvement
Onsite FM team provided access to disable if issue arises
Activate Smart Rooms and Widget
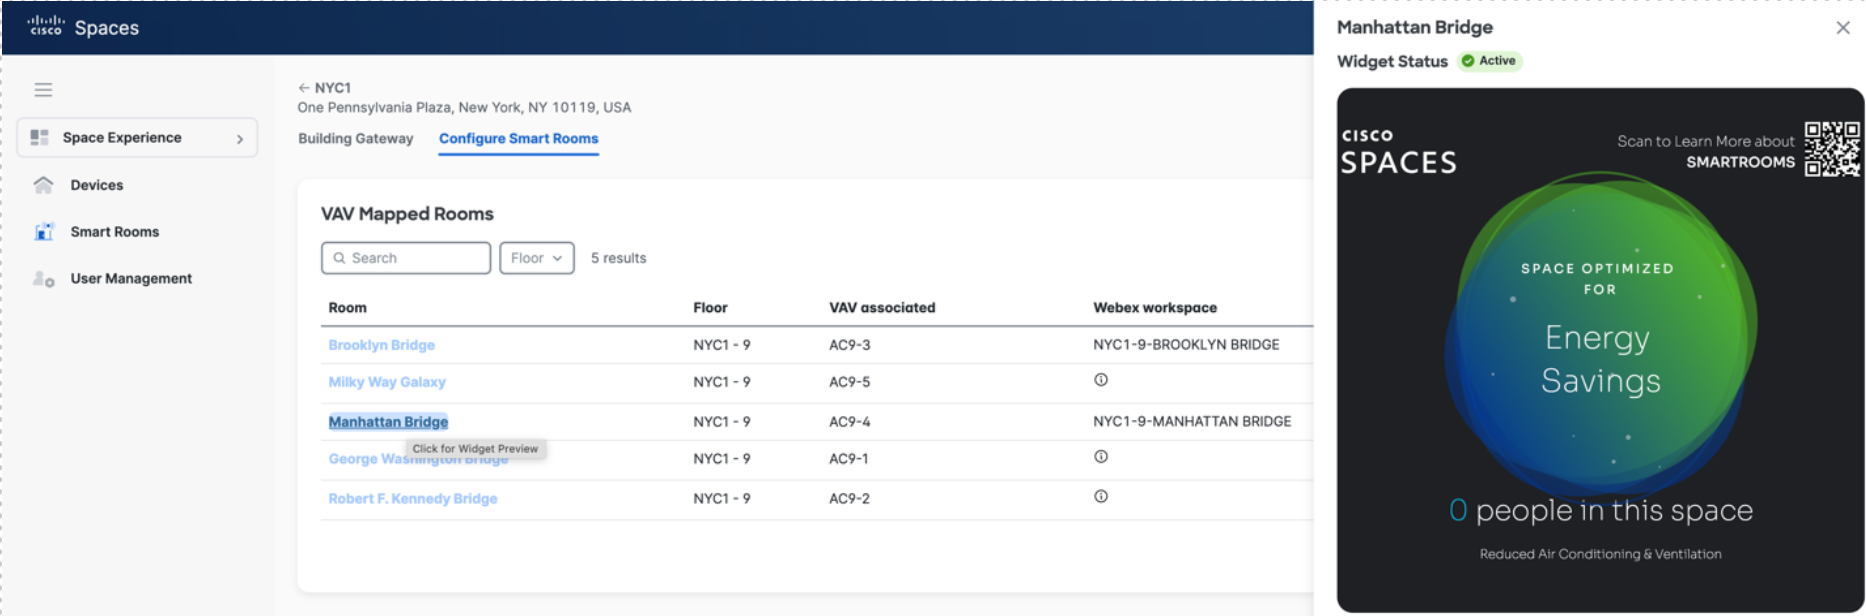
In Space Experience navigate to Smart Rooms> Buildings
Select the Building you want to enable Smart Rooms in and choose Configure Smart Rooms

Toggle on the rooms to be enabled

Activate – Enables the gateway to perform the setback logic, making the workspace a Smart Room
Widget – Enables the Webex web widget on the screen of the device, giving occupants visibility into what state the Smart Room is in
Select a room to see the widget and status of the Smart Room
REFERENCES
Customer one Pager
How it works
We use your existing Webex collaboration devices, such as the Webex Room bar, as an occupancy sensor by utilizing the person detecting ability native to the Webex cameras.
That occupancy data is pulled down from the Cisco Spaces Cloud to the Cisco Spaces OT gateway which connects to your BMS network as a BACnet device. The OT gateway is the only new hardware needed if you already have Webex collaboration devices installed.
When the BMS is operational, and a space is unoccupied, we set back the heating or cooling point for that space to cut down unnecessary heating or cooling. When the space becomes occupied or is about to be occupied (if integrated with your meeting calendar) the set-back is released and the BMS returns the space to an optimal temperature. We continue to monitor temperate while the space is occupied to ensure optimal conditions are maintained.
Pre-Requisites:
Your building has a BMS using the BACnet communication protocol (such as Johnson Controls - Metasys, Siemens - Desigo, Honeywell - Niagara (Tridium) & WEBs, Schneider Electric - EcoStruxure, Trane - Tracer SC, Distech, Optergy, or many others)
Your building has room-level HVAC controls
You are an existing Cisco Spaces Customer with an ACT license; Rich maps operational, with a WebEx control hub integration
Key Benefits:
1. Energy Savings: Eliminates unnecessary heating and cooling during idle periods, lowering utility costs.
Optimized Wellbeing: Spaces are comfortable upon arrival and maintained at optimal levels throughout meetings, enhancing tenant experience and productivity.
Sustainability An average-size meeting room can save 100lbs of carbon per year, equivalent to 2 fully grown trees.
Data-Driven Insights: Gain insights into room utilization patterns and energy trends through detailed analytics.
All data to and from the cloud is sent through an encrypted tunnel. BACNet data is sent unencrypted.
Data From Cisco Spaces Cloud
Room Schedule
Room Occupancy
Person Booking the room
Objectives
Setback - To setback the conference rooms occupied setpoints when the rooms are not being used to reduce wasted energy from HVAC equipment.
Precondition - Precondition conference rooms prior to usage to provide occupants a comfortable room upon occupancy.
SOO Notes
For the VAV Setback and Preconditioning sequence changes only the OCSP & OHSP points will be written to. It’s important to note that the heating setpoint should never be greater than the cooling setpoint and should always be at a minimum of 1°F less than the cooling setpoint.
The Schedule point is an important point that is used to indicate that the Air Handler that serves the VAV box is on or off. If the Schedule point is reading zero it indicates that air is not available for the VAV box resulting in no available cooling.
Setback SOO
When the room is not scheduled the VAV occupied setpoints will be adjusted to reduce the cooling or heating demand of the room. The room will still be conditioned just at different setpoints when not scheduled. The sequence will perform as follows:
When
Cisco Room Schedule = OFF and the VAV SCHED = 1
Write OCSP default value +4°F at priority 10 (Example default OCSP =73°F new value = 77°F)
Write OHSP default value -4°F at priority 10 (Example default OHSP =71°F new value = 67°F)
Cisco Room Schedule = ON and the VAV SCHED = 1
Write OCSP current value null at priority 10 (This change VAV box to operate at default)
Write OHSP current value null at priority 10 (This change VAV box to operate at default)
Cisco Room Schedule = ON and the VAV SCHED = 0
Write OCSP current value null at priority 10 (This change VAV box to operate at default)
Write OHSP current value null at priority 10 (This change VAV box to operate at default)
Note with the VAV schedule off air might not be available to the room which is out of Views control.
Cisco Room Schedule = OFF and the VAV SCHED = 0
Write OCSP default value +4°F at priority 10 (Example default OCSP =73°F new value = 77°F)
Write OHSP default value -4°F at priority 10 (Example default OHSP =71°F new value = 67°F)
This will typically be seen at the end of the day and will keep the box in setback when the building starts the next morning unless there is a Cisco Room Scheduled for first thing in the morning.
Note with the VAV schedule off air might not be available to the room which is out of Views control.
Precondition SOO
Prior to a Cisco Room Scheduled event Preconditioning is used to have the room at default occupied setpoints at the start of a meeting. It’s important to understand how long it takes a room to recover from a setback state to an occupied state. For example its important to know the average time for the space temperature to decrease or increase by 1°F. For example if it takes 5 minutes for a space to drop 1°F and we are transitioning from a space temperature of 76°F to a setpoint of 73°F the room should be taken out of Setback 15 minutes prior to the Cisco Rooms scheduled event start time. The same logic will be used for heat recovery. For this sequence we will call these points as follows.
Cool Recovery Time (CRT) = Average minutes it takes to lower the temperature 1°F
Heat Recovery Time (HRT) = Average minutes it takes to raise the temperature 1°F The Preconditioning SOO shall be as follows:
When Preconditioning Cooling
Cisco Room Schedule has an event starting in 30 minutes and the space temperature is above the default cooling setpoint the precondition start time is calculated as follows:
Precondition Cooling Start Time = Room Schedule Time - ((ST - default OCSP)*CRT)
Example: ST = 75°F, default OCSP = 73°F, and CRT = 5 minutes for meeting starting at 11:00am the Precondition Cooling Start Time = 10:50am.
At Precondition Cooling Start Time write the following:
Write OCSP current value null at priority 10 (This change VAV box to operate at default)
Write OHSP current value null at priority 10 (This change VAV box to operate at default)
When Preconditioning Heating
Cisco Room Schedule has an event starting in 30 minutes and the space temperature is below the default heating setpoint the precondition start time is calculated as follows:
Precondition Heating Start Time = Room Schedule Time - ((ST - default OHSP)*HRT)
Example: ST = 67°F, default OHSP = 71°F, and CRT = 5 minutes for meeting starting at 11:00am the Precondition Heating Start Time = 10:40am.
At Precondition Cooling Start Time write the following:
Write OCSP current value null at priority 10 (This change VAV box to operate at default)
Write OHSP current value null at priority 10 (This change VAV box to operate at default)
Note: If the room is only served by cooling only VAV boxes preconditioning heating is not available and should not be used for the space.
Monitoring and Exception Handling
The system is designed for resiliency. All control programming runs on the edge device, and not in the cloud. If requested the system can be deployed in High-availability configuration if the customer opts for the premium package.
The gateway, WAN and LAN connectivity, and individual Webex devices are all monitored as part of the managed service. Cisco’s support teams will proactively address any issues, if they cannot be resolved by the support team or necessary changes will impact the customers systems, the customer will be notified of the issue and steps to be taken for resolution. If disruption in connectivity will significantly impact performance of the system the team may disable the Smart Rooms functionality until it is resolved, allowing the building’s default programming to fully assume control.
If there is a failure in connectivity or the gateway, the following behaviors ensure a safe degradation of functionality:
Webex Devices Lose Connectivity
If Webex cameras or devices in the room lose connectivity, there will be no occupancy data coming from the room. In this event the gateway will release any programming and set all setpoints back to the default building programming. Once connectivity resumes the application will resume proactive conditioning.
Loss of Internet Connectivity
If there is no connection to the internet the local gateway will not receive occupancy data or calendar data for setbacks and preconditioning. In this event the gateway will release any programming and set all setpoints back to the default building programming. Once connectivity resumes the application will resume proactive conditioning.
Hardware Failure
If there is a hardware failure the support team will be immediately alerted and can alert the customer to take action. The latest setpoint changes will remain in place. Once the hardware comes back online it will resume adjusting setpoints. If the device remains offline, depending on the BMS the setpoints will eventually be overridden by the existing programming of the BMS.